Well, I've had my fun. I've driven the car night and day, to shows, to towns, to fast food joints, stores, meetings, family events, work, and play. I've driven 2,621 miles since I got the car out on the road again after it's four-year furlough. But now the darkness is falling along with wind, rain, and the average temperature. Fall has fallen upon the great Pacific Northwest and so has the number of hours I am able to drive Ol' Rusty. With the loss of wheel-hours, I gain shop time. Time to start and finish projects that I've been putting off with the excuse of "Just one more trip, we don't know how many sunshine days we have left". Well, now we know.
So I thought to myself, "Hey self. What would you like to do to improve the driving experience?". "Put in a CJ 429, a T5, and 3.25 locking rear diff!", I exclaimed. "No", I replied to myself calmly, "we don't have the budget for that but do you know what would be nice? Power steering". I asked, "why's that"? "So the wife can drive it too.", came the reply. But I knew that's just what we would tell other people rather than the truth that I'm an old, weak, software developer and my arms get tired after a few hours of slow maneuvering. But that would just be our little secret. I cackled quietly to myself about my own cleverness and set to searching the interweb for a suitable candidate.
My intention was to refurbish an original system rather than to buy a modern equivalent. I knew that they had a terrible reputation for leaks and annoyance and from reading the VMF, people yank them all the time in favor of manual steering for simplicity and to avoid the horse power loss. So, it shouldn't be too difficult to find a set fairly inexpensively. My goal was to do it as cheaply as possible as has been the unifying theme throughout the entire build of this car. I set a goal of $300 for the entire system including pump, power cylinder, brackets, and linkage and then whatever replacement and rebuild parts cost. I found a seller on the VMF willing to meet my requirements and gave me a deal on shipping. A week or so later, I had a rather distressed, complete, power steering system sitting on my bench awaiting my attention. The nice thing was that I could still drive the car while I was rebuilding the power steering system and so I put some more miles on her during the day while I cleaned, painted, and rebuild during the night.
The Mustang power steering system is pretty straight-forward. There's a pump that squirts Type F transmission fluid through a high pressure line into a control valve. The pitman arm from the steering box is connected to a ball stud on the control valve that feeds pressurized fluid into the slave cylinder that is basically a hydraulic power cylinder that forces the wheels to turn based on which way the ball stud is pushed by the steering box. Fluid is cycled back to the pump via a low-pressure return line.
Since the control valve is part of the center link, the center link is different than the manual steering center link as is the pitman arm and idler arm. Otherwise, most all of the other parts can be used including the steering box and the tie rods. Now, a proper power steering system utilizes a fast-turn type steering box but you don't have to and I chose not to since I had already spent good money having my manual steering box rebuilt and didn't relish the thought of rebuilding yet another steering box.
This rebuild is a BIG job so I'll be breaking it up into a series of posts with the rebuild of the control valve being the first followed by the slave cylinder, the pump, and finally, the installation. For the entire rebuild I used my old faithful Factory Service Manual. It gives step-by-step instructions for each task but it misses a couple of details that I'll try to cover. The various joints are separated with the assistance of a pitman/tie rod remover. Never use a pickle fork... ever... never... it's just bad. Don't do it.
So, the first step was to break the system down into it's basic parts. The tie rods can go away since I'm reusing my existing ones as can the hoses since all will be replaced with new.
 |
| How it all began. A complete power steering system, in pretty bad shape. |
 |
| The basic parts. Slave cylinder, control valve, and center link. |
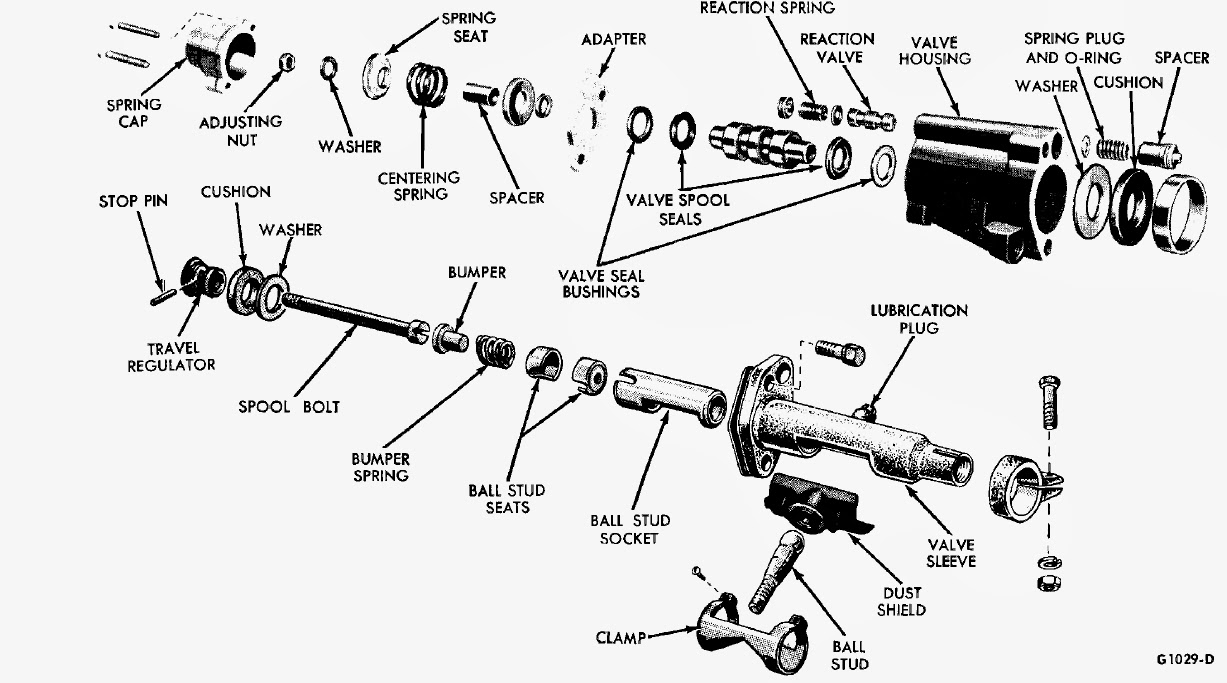
The control valve is fairly easy to break down. There are two sheet metal screws that hold a cover over the ball stud's rubber boot. Remove the screws and the boot comes off exposing the ball stud. Then you can remove the end cap from the valve housing and remove the nut from the end of the "spool bolt". (If you're wondering what the heck the parts are that I'm referring to, just open up the exploded control valve image below). The two bolts that hold the valve sleeve onto the valve housing can then be removed and the valve sleeve assembly pops off of the valve housing.
 |
| Removed the ball stud cover and boot. |
 |
| Removed the centering spring cap. |
 |
| The Valve Sleeve assembly separated from the valve body |
The spool valve can then be slid out of the housing. It will pop it's seals out as you push on one end. It's easiest to pop out the centering spring end of the housing (the smaller end). There's a washer, cushion and spring ring on the valve end of the housing that can be slid out to remove the seal from that end of the housing as well. There's also a little "reaction valve" in the housing that can be removed but first the caps on each end have to be popped out. Don't lose the washers or spring.
 |
| The valve spool pushing it's seal out the centering cap end of the valve body |
 |
| Valve spool, removed. |
 |
| The stuff on the valve sleeve end of the valve body |
The valve sleeve assembly can then be broken down by first pulling the spool bolt outwards and pushing the stop pin out between the sleeve's flange and the travel regulator. Then unscrew the travel regulator from the ball stud socket that it's threaded into (see the exploded view). The ball stud and socket can then be worked out of the end of the valve sleeve.
 |
| Removing the pin from the travel regulator and spool bolt |
 |
| Unscrewed the travel regulator from the ball stud socket in the valve sleeve. |
 |
| Completely broken down |
I then cleaned up the various parts, primed, and repainted them. I bought the
control valve rebuild kit which included new seals, gaskets, centering hardware, and ball stud hardware. If the kit you buy doesn't include the
ball stud socket sleeve you can buy one separate. The control valve spool itself can become worn and needs to be inspected. If you need one, you can get new ones from the
various vendors. Mine was reusable.
 |
| Ready for some cast iron paint |
 |
| Ready for assembly |
 |
| Ball stud, socket, stud seats, bumper, and spring installed in the valve sleeve |
 |
| Inserting the stop pin into the spool bolt and threading the travel regulator into the ball stud socket. |
 |
| Assembled valve sleeve assembly |
 |
| New boot. |
 |
| New boot clamp |
 |
| Inserting valve spool into housing from the sleeve end. |
 |
| Inserting the seal on the centering spring end. |
 |
| Inserting the seal on the valve sleeve end. |
 |
| Valve sleeve end washer, bumper, and retaining ring |
 |
| Installing valve sleeve onto valve housing and new gasket |
 |
| Almost done |
The adjustment of the centering spring nut is probably one of the most important adjustments that needs to be done to the control valve. The Factory Service Manual covers this pretty well but basically, you tighten it to around 100
inch pounds and loosen it a quarter turn. The cap can then be put on. Don't forget the ring gasket.
 |
| Adjusting the centering spring |
 |
| Fully assembled control valve |
One of the biggest complaints about Ford power steering systems is the leaking. Well, guess where a majority of leaks come from. We've replaced the seals and gaskets but there's still a possibility of leaks. Guess where from. Come on, guess...
.
.
.
Give up? If you said, "From the tube seats", you win! These rather weak aluminum inserts, once crushed by their chosen hydraulic hose, will probably never accept another hose into their loving embrace again. Never fear, there's a man that goes by the name of
Chockostang that carries ALL of the parts for these systems and will sell them to you including the tube seats. The tube seats are just press-in aluminum thingys that are easily removed and replaced. All I did to remove them was to grease up a 1/4-20 tap, threaded it into the seats and pulled them out. The grease on the tap was to keep the chips from the tap from falling into the valve causing it to instead, stick to the tap. It was with this method that I removed all of the smaller 5/16" tube seats and replaced them with new ones from chockostang. Sometimes you can just insert a hooked tool into the seat's hole and wiggle it loose.
 |
| Boogered-up tube seats |
 |
| Pop them out |
 |
| Ain't nobody got time for that! |
 |
| New tube seats. See the difference? |
So, I was feeling all smug with my freshly-rebuilt control valve when I happened upon a
thread on the VMF discussing control valves. In the thread, it was
casually mentioned to "
be sure to put the spool in the correct way, grove [sic] on the small o.d. has to go to the big valve side[hose side] or it will not work". My eyes popped open at this. The factory manual said NOTHING about making sure the spool valve was facing a particular direction. So I inquired further and
chockostang replied that indeed, the "groove" on the spool valve has to be on the centering spring end of the valve (as opposed to the "hose side" as mentioned in VMF thread). I felt it best to double-check my install of the valve and sure-enough, I had it backwards. I reversed it and buttoned it back up, no-one the wiser... except everybody reading this of course.
 |
| Oops, wrong way. |
 |
| This groove has to be on the centering spring end of the valve housing. This isn't the actual spool I used though as it was too worn. I had another one (shown above). |
I had to re-adjust the centering spring and re-install the cap, of course but once that was done, I used a grease gun to squirt a very light pump of grease into the zerk fitting of the control valve (too much may cause it to bind) and called this task done.


One detailed and helpful post, once again, Alex! I guess there's just some skew in pic (#26) that makes it look like the adapter is bent.
ReplyDeleteThanks Risto. No, there's no bend. The adjustment has to be made with the cap screws removed which lets the adapter plate float free. It's actually the valve spool pushing against it from the inside. Once the cap is on, it all lays down flat.
DeleteYou did it again Alex! An absolutely exquisite detailed account of rebuilding the factory power steering. Mine has the factory power steering and thanks to you, I'll be rebuilding mine according to the book of Alex!
ReplyDeleteThanks Dennis! But I strongly recommend that you use the factory service manual instead. :-)
DeleteThat was a close call on the spool valve. Sometimes I hesitate to spend extra time double checking, but it pays off. Great work Alex. I suspect my power steering unit is a replacement piece, and it came back with a "clank" noise from the paint shop so I might have to look into it later. If I ever have to do this job, I'll make sure the rebuild kit from your link is the right one for my PS.
ReplyDeleteThanks Ivan. Yeah, make sure it also includes the ball stud socket so you don't have to buy it separate. The actual kit I bought was from NPD which didn't include the socket. It looks like the CJPP kit I linked does though.
DeleteGreat walkthrough Alex, hopefully I won't need it as I plan on doing rack and pinion with a more updated system. Your posts always entertaining and informative!
ReplyDeleteThanks Grant. I can't wait to see your steering install.
DeleteThanks Alex! Without you, we would either have to pay $25 for a Tom Monroe manual or stand for an hour and a half at Barnes and Noble and hope we remembered all the sequences. Good stuff!
ReplyDeleteIsn't life crazy. You have a 50/50 chance of getting that groove on the right side and of course, it is on the wrong side. It's a wonder we don't all go insane rebuilding cars :)
rj
LOL! Ain't that the truth!? Thanks RJ.
Delete