Okay so
headrests are great at keeping our heads from snapping back when we get rear-ended but what about flying forward? Airbags would be nice but the best we can hope for in a 68 Mustang Convertible is to try to improve the seat belt situation. Currently, the car is outfitted with simple lap belts and a collapsible steering column in case "something" (e.g. - my face) impacts it. Well, call me chicken but I'd just prefer not to test the collapsible steering column at all. So, the plan for the day is some kind of 3-point shoulder belt.
In 1968 shoulder belts WERE an option (yay!). But they were only in Fastbacks and Coupes (boo!). Even then, they were of a "fixed" style meaning that there was no retractor. Instead, the user had to simply lock his/her body to the seat back with no ability to lean forward without loosening the shoulder harness. So, many companies provide after-market retractable seat belts but their installation into the car is still the responsibility of the buyer and, unlike their roofed brethren, there are no pre-made mounting points on a convertible for a 3-point belt.
3-Point belts require a total of four mounting points. The first is for the retractor itself. The second is for the end of the main belt. The third is for the upper belt guide. The fourth is for the female side of the belt latch which usually consists of a mounting point, a short length of webbing, and the buckle. There are many many combinations of possible mounting locations and lots of web sites with instructions for the recommended mounting of the various vendor's belts such as the image to the right (from
Wesco Performance's web site). The installation of retractable belts was actually my intention
waaaayyy back when I modified the inner rockers to contain an additional belt mounting point right in front of the back seat.
Note that the "shoulder sash guide", in the image above, that mounts to the B-Pillar is lower than the top of the driver seat back. This is the kind of "traditional" method of installation for convertibles with after-market shoulder belts and I was okay with it... until I started reading this
THREAD , and this
THREAD on the VMF. The assertion is that the upper mounting point shown above provides are very poor and potentially dangerous geometry such that when the belt locks up and the passenger is thrown forward at a high right of speed, that the belt itself could possibly crush the occupant's spine down to the height of the upper mounting point. Now, I don't know which might be worse, having NO shoulder belt and thus denting my pretty steering wheel with my face or potentially compressing my spine (which may or may not happen, and which I may or may not recover from) . I personally would choose spine compression but I digress.
 |
This is the goal of the project
("KEN_IN_MD's" car). |
Fortunately, we may not have to suffer either misfortune at all thanks for VMF user "
Ken_In_MD" whom has obviously researched this issue to a great extent and has offered a solution to the problem of mounting shoulder belts in a Mustang convertible. Enter the 1992-1996 Ford Econoline van passenger side seat belt! It's claim to fame is its long, high tensile steel, extended sash guide. It just happens to be the exact length to bring the shoulder mounting point forward enough from the convertible top well to just behind the top of the seat back and is a couple of inches higher than the highest point of the B-Pillar. This looked like an optimal solution and compromise to me so I jumped all over it.
So, the first task was to actually acquire the seat belt in question. A 92-96 Ford van belt has surely been on the market for decades and thus is readily available in every parts house for pennies right? Wrong! These are now NOS replacement parts for a nearly classic car in themselves. New from Ford you can find them for a mere $300 each. Ack! Not the kind of news a frugal man such as myself wants to hear. So, I said "screw it!" and bought a set of the after-market belts from CJ's for a much more reasonable $169. I got them in and examined them and realized more and more that I wanted the Econoline sash, all premade with it's chrome loop! I sent the the new belts back and hit the Pick-N-Pull yard. They actually had 3 or 4 92-96 Econoline vans in various states of disrepair and all had their belts. This is when I realized that only the passenger side used the coveted extended sash guide with the correct S curve at the end. Fortunately, two of the vans had identically-colored passenger side belts in tact. I went to pull them with my trusty tool kit and came to my next reality slap; the bolts were gianormous Torx! Well, T-50 to be exact, so after a quick shopping trip at the local Ace for a new bit, I had them in my grubby hands, paid my $38 (for both.. those FOOLS!) and ran home cackling with glee.
Well, nothing is easy and these were no exception. They have various tabs that needed to be hacked away before they could be mounted; a simple job for my angle grinder's cutting disk.
 |
| The reel's brackets contained annoying tabs. |
 |
| Chop! |
 |
| The buckle mount looked like this |
 |
| Chop! |
The sash section consists of a spring-steel strap with a rubberized sleeve. There was also a mounting bolt that was affixed to the strap via a retainer that when removed, allowed the sleeve to be slipped off, cleaned up, and dyed light parchment. Unfortunately, the sleeve was not without damage for it's years of use. I'm not sure if there's a way to repair it.
 |
| The sash guide disassembled. |
 |
The belt after preparation ready to be mounted. It's a bummer the sash cover was boogered up.
|
I worked out a simple design for a mounting bracket. Ken_In_MD used an L bracket that came with a seat belt mounting kit and bolted it to the front of the top well. I chose to take a slightly different approach and instead mounted a bracket to the inside panel of the top well out of the way of the top frame via 2 3/8" grade 8 bolts. I was a bit surprised that the metal of the top well was relatively thick, about 1/8". The end of the sash extension was bolted to the bracket with a grade 8 nut. The heads of the bolts that were used to mount the brackets did not interfere with the interior quarter panels in any way. I was afraid that I'd have to mill out clearance pockets but there was no interference whatsoever.
 |
| Made a bracket out of 1/8" steel. |
 |
| Drilled mounting holes in the side of the top well. |
 |
| Grade 8 bolts holding in the freshly painted bracket. The heads didn't interfere with the interior panels. |
 |
| The sash mounted to the bracket |
The reel was then bolted straight into the extra mounting hole I had previously installed in the rear of the inner rocker. The end of the webbing was bolted to the original seat belt mounting point on the forward point of the inner rocker. Finally, the buckle section was bolted to the original seat belt mount on the tunnel.
 |
The rear mounting point previously installed on the inner rocker
|
 |
| Reel and webbing end mounted to the inner rocker. |
 |
| Installation complete(?) |
After installing the entire belt assembly and replacing the rear quarter interior panels and installing the seats, I tested the belt and it felt and fit quite nicely. I then ran the top up to see if there were any issues and unfortunately I found one. The edge of the top frame's link bar fully contacted the new bracket. Doh! I obviously needed to grind a notch in the bracket to clear the bar but the whole belt had to come out so I could grind it at the bench where I wouldn't burn anything with the sparks. Another hour later and I had the "adjusted" brackets re-installed. I tested them again and they passed.
 |
| Link bar banging against the new bracket. Doh! |
 |
| Ground out a notch to clear the bar. |
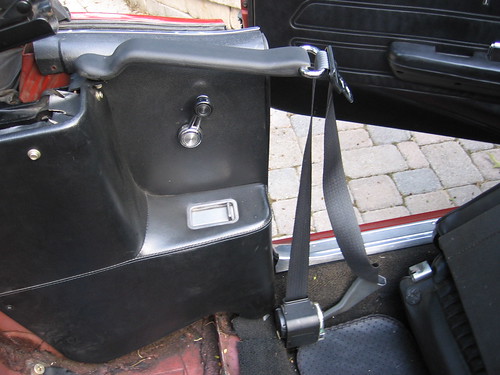
Finally, the passenger side bracket was fabricated and installed with no problems.
 |
| Passenger side done. |
 |
| New belts and headrests. |
 |
| Side view. |
I then got my wife and we went for a really nice evening drive. The belts worked like their modern car counterparts and locked up when I hit the brakes and then released correctly when expected. I pray that we never need them.
Now only two minor problems need to be resolved. First, the buckle section webbing needs to be shortened by about 3 inches. Currently it sits up over my hip and I'm thinking that in the event of an accident, my pelvis might be broken. Second, my awesome new convertible top boot no longer fits because the sash guides are now in the way. I have it marked for modification and need to find an upholsterer to cut a slot of some kind in it while somehow making it look stock. More to come on that at another time.
Update 01/28/2015: There's a discussion regarding this "solution" on the Australian MustangTech web site.
LINK.


