This car started out as C code with a two-barrel carburetor. However, when I rebuilt the engine, I had installed a four-barrel intake manifold which, without something to put on it, leaves a rather evident empty spot right there on the top of the engine where everybody can see it. I had to find a way to remedy this problem... a way to breathe new life into this old engine. There are many many options out there but very few fit my particular... shall we say... frugal... requirements. There are also more opinions than.. well, lot's of opinions on which carbs are the "best". In 1968 the four barrel carb came on the "J" code engine. A Ford 302 with an Autolite 4300 on top. As far as I know, all Mustangs that came with a 289 in 1968 were 2-barrel Autolite 2100 "C" code cars like mine and even then, the 289 only lasted to about mid year. So, if I wanted to simulate a J code, I'd have to A) get a different engine, and B) get a 4300 carb, neither of which appeal to me for this car. Why not the 4300 on a 289? Honestly, I have no idea other than it doesn't seem to be a popular carb and I wanted one with a lot of end-user support and the winner of the "end-user support" award appears to go to the Autolite 4100 based on forum responses regarding "which carb is best?" type of posts (not to mention at least one recommendation on a prior post in this blog).
So, I'd made up my mind and how much can a beat-up old 40+ year old carb cost anyway? Can't be more than... what? 60 bucks? Well, like everything else I get into, it seems, the prices skyrocket for one reason or another. In this case, I think one or more of the Mustang rags wrote a glowing article regarding the 4100 and how to adjust it a few years ago and now you'd think these things were cast out of gold instead of aluminum and brass.
One company even restores them to better than new for just under 800 clams. Well, I have to admit, they ARE beautiful. They even go to the trouble of re-plating the carb and updating it for modern fuels and such. However, for me, this is not a show car. I just need the carb to atomize gas and feed it into the intake manifold. I don't need a work of art.
So, I watched eBay for awhile to get a feel for how the market is for these cores and it looks like I could get a "this was working when I pulled it" carb for around $250-$300 or a core for around $100. My research shows that if the most popular carb is the 4100, then the most popular year for the 4100 is the last year that it was put on a 289 Mustang, 1966. Hi-Po versions of the carb beat out the competition due to their rarity and the price of a core reflected that. For me the, best flavor of 4100 would be a 1966, 1:08 venturi. Since I'm not in "concours" mode, I'm more concerned with functionality (and price!) than correctness. So, I pulled the trigger on this C6PF-H that I found on eBay for $125. It looked complete from the pics, had the desired "short snout" pump, and met the 1966 1.08 venturi requirement. Although the actual number C6PF-H stands for 1966 Ford Service Replacement (not original to a particular Mustang), it's 480 CFM rating would still probably be good for my mild 289 engine.
 |
| The pic that was on eBay |
There were a couple of 4100 rebuild kits on eBay and various Mustang vendors that cost $50. The vendor excuse for charging $50 was that THEIR kit included the secondary diaphragm that is rumored to be missing from the everybody elses kits. I decided to search some more and found
THIS kit from Mustangs Unlimited for $27 that plainly shows the secondary diaphragm and otherwise looks complete so I bought that one instead. Well, I got it and the contents are complete but not exactly like the picture on the MU web site. For instance, there was only 1 horn-to-body gasket instead of the two shown and completely different needle valve assemblies than shown. The kit is good though so don't let those details deter your decision. I laid out some paper on the bench and starting disassembling the carb marking the paper where I laid the parts with their sequence in disassembly so I could just reassemble in the opposite sequence. Also, I took many reference pictures.
 |
| Completely disassembled |
 |
| Not the kind of dirty body I like to see. |
I poured my can of carb cleaner into a small plastic trash basket and put the carb body in. Since I only had one gallon, I had to soak one end for an hour and then turn it over and soak the other side. I then rinsed and dried the body, shot compressed air through all of the tiny jets and orifices and then took steel wool to it. Despite all of my efforts, I could not clean up the secondary bowl any better than that. I think they call that "carb cancer". Basically, the coating is gone and oxidation has taken over. I'm hoping it's not fatal in the short term and that this carb still has some years left.
 |
| Dunking the carb in cleaner. |
 |
| As clean as I could get it. Nasty oxidation in the secondary bowl. |
While I was cleaning the venturi clusters, I noticed that one of the emulsion tubes of the primary cluster was cracked. I read up on this a bit and found it to be a fairly common problem. Some guys leave it alone, others solder the crack. I decided to try to remake the tube. The tubes are .2175" inches outside diameter with a flare on the end of .279". I found that 7/32" brass tube from the hobby shop is only 125 thousandths too large and 9/32" tube is 225 thousandths too large. After a few failures, I figured out how to accurately solder the large tube over the small tube to kind of simulate a properly expanded flare. The emulsion holes in the tubes are right at .040" and I had some .040 drill bits handy (1mm) so I laid a piece of transparent tape over the holes of a good tube and transferred them to the fabricated tube. Finally, I chucked up the tube into my drill press and sanded the "flared" end down to .279". I then pressed the tube into the venturi cluster making sure to aim the holes in the same direction as the originals were. By the way, I did try to find an old carb, venturi cluster, or even replacement tubes but came up empty (for less than $25). Otherwise, I wouldn't have bothered.
 |
| Cracked! |
 |
| Newly fabricated tube next to original that took some damage being removed. |
 |
| Flared end comparison. |
 |
| New emulsion tube installed. |
Now came time to assemble the carb:
 |
| Venturi cluster gaskets on primary with ball and weight (center hole). |
 |
| The secondary diaphragm assembled compared to the original. |
 |
| Secondary diaphragm and lever in position. |
 |
| Secondary pump cover with lever and pin in place. |
 |
| The "economizer valve" installed with gasket. |
 |
| Economizer valve cover. |
 |
| Primary pump sitting on it's spring. |
 |
| Primary pump lever and cover ready for business. |
The new kit came with some slightly different needle valve assemblies. The new "needle" valves aren't needle valves at all but still function like a needle valve. I didn't ask questions, I just followed the instructions and installed them followed by the primary and secondary jets which just screw back into their seats.
 |
| Funky new needle valve compared to original valve seat. |
 |
| Float assembly for the new valve. |
 |
| Float mounted in the bowl on the new valve. |
The float levels had to be adjusted for the new valves. Basically the same procedure as with the old style valves, Hold the valve end of the float against the valve and measure from the end of the float to the top of the bowl. The specification is 1/2".
 |
| Adjusting the float. Just bend the tang up or down. |
 |
| Floats, venturies, and pumps installed. |
Time to turn it over and work on the other side installing the primary and secondary throttle levers and plates which consisted of just sliding the shafts into the holes and aligning and fastening the plates into the bores. After doing this, I had to screw "legs" onto the carb so I could set it level on the bench without the levers getting in the way.
 |
| Bottoms up! |
 |
| Throttle levers installed. |
 |
| Getting a leg up. |
The lever linkages were installed next along with the choke housing. I hooked all this stuff up so I wouldn't have to work around the bowl cover later. The bowl cover gasket was then installed which just kind of lays over the body. Note the two holes in the gasket positioned over the secondary bowl. The screws WILL install with the gasket in the wrong position.
 |
| Choke, linkages, and bowl cover gasket in place. |
 |
| Bowl cover bolted down. |
Finally, the choke plate was installed and it's levers were hooked up.
There are quite a few steps in the adjustment of the 4100. All of these adjustments are listed and described in the instructions that came with the kit. One of the weird adjustments was the "choke valve pull-down adjustment". This involved sticking an 1/8 gauge in the choke piston hole, clamping the lever in that position (gently), and then measuring the gap between the choke plate and "air horn wall". In this case, it had to 1/8". The choke plate adjust nut was turned to get the correct gap.
 |
| Gauge inserted into the choke piston. |
 |
| Checking and adjusting the choke plate gap. |
I performed several of the required adjustments but have decided that I will wait until the day that I'm about to install the carb on the engine (after the engine is back in the car) to make sure that all adjustments are double-checked and correct.
 |
| Done! Choke side. There's still a heat shield that goes over the choke but I'll put that back on later. |
 |
| Done! Throttle side. |
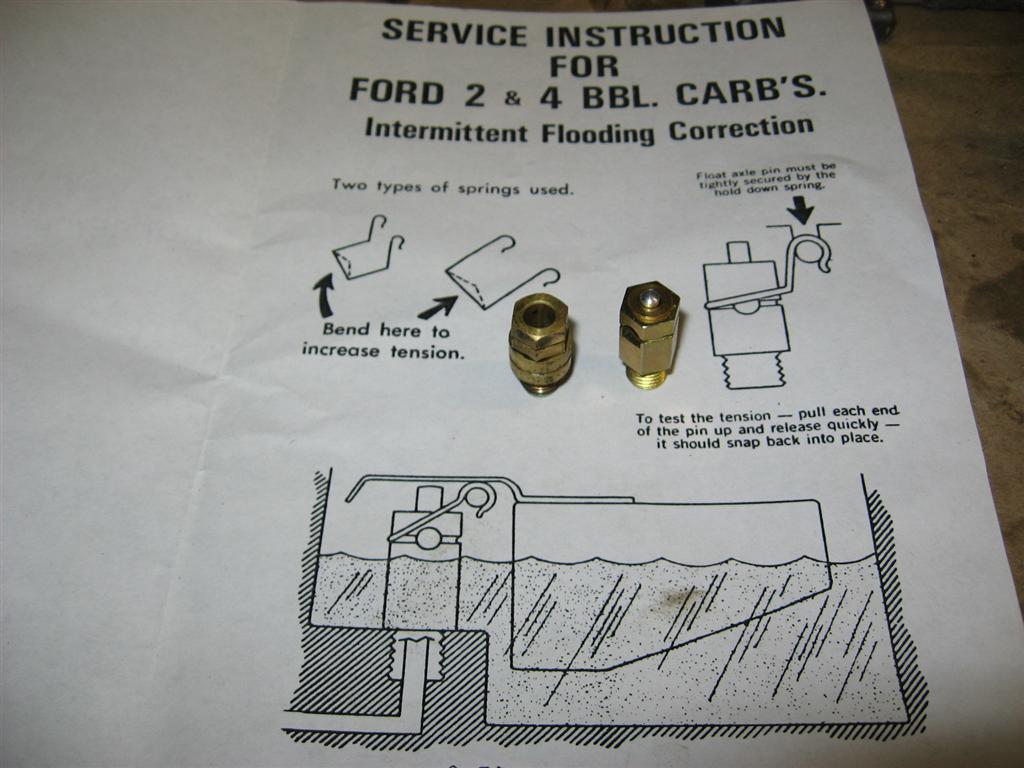
Think it'll run? I guess I'll just have to wait to find out. By the way, I took the liberty of scanning the instructions. Keep in mind that these are the kit manufacturer instructions, not the factory instructions. They will assist in making basic adjustments though I think. Enjoy:
Autolite 4100 Adjustment Instructions
Update 8/7/2012: I found an interesting thread on
Ed's Carburetor Forum that mentions "6P-H" type carbs and labels them as the most generic and thus least matched of all of the 4100 carbs. Read up and decide for yourself if you're thinking of getting one.


Nice description Alex - and as always, clever handyman fix on the emulsion tubes!
ReplyDeleterj
Thanks RJ!
ReplyDeleteImpressive fabrication on the emulsion tube, Alex. Excellent details on both description and photos. Thanks for the 4100 "carb class."
ReplyDeleteThanks Dennis!
ReplyDeleteGreat work as always and a fantastic insight into how to choose a carb....I'll be back to read this post again when I get to this stage.
ReplyDeleteThanks Ian!
ReplyDeleteAmazing work Alex!
ReplyDeleteThanks James.
ReplyDeleteIt will run fine. Excellent choice for your 289.
ReplyDeleteThanks Ripa.
ReplyDelete