
Fast forward to this week. I need to get a hood on the car so I can align the fenders and doors so, it was time to dust off the new hood and set to work. First thing I did was to compare it against my original hood. One thing immediately noticeable was that the new hood was way lighter than my old hood. Either the new one is a cheap repro or my old one has a ton of bondo on it. Now, new repro hoods aren't really that expensive but the freight shipping charges double the price so, being a cheap b*****d, I decided that since I'm going to upgrade to Shelby glass in a few years, I could live with a cheap hood. Besides, I like the turn-signal hoods. Here it is... beauty ain't she?

Red is the wrong color plus I needed to get it down to bare metal. I could media blast but I've heard horror stories about blasting hoods plus, see the previous paragraph where I'm a cheap b*****d. I bought this paint stripper at Home Depot. The aircraft stripper stuff at NAPA was nearly $50 a gallon! This stuff was around $20.

I thought I'd go ahead and make the stripper's job easier by breaking up the surface of the paint with a sanding disc.

Then I liberally brushed on a heavy layer of stripper:

I let it work for about 20 minutes and then scraped it off with a wide bladed putty knife.

I applied it a couple more times to get a layer of gray primer but then it stopped working at this point (would the fifty dollar stuff have gone all the way to metal?). I think this is original paint (Lime Gold) and red oxide primer. Could this be an original hood?

I decided to strip the rest of the way with the angle grinder and flap disc.

That's all good and fine but the real work is underneath. I lightly did a little stripping to try to expose any part numbers. I found a couple of codes but they were unreadable after I... kind of... made them unreadable with my 46 grit flap disc.
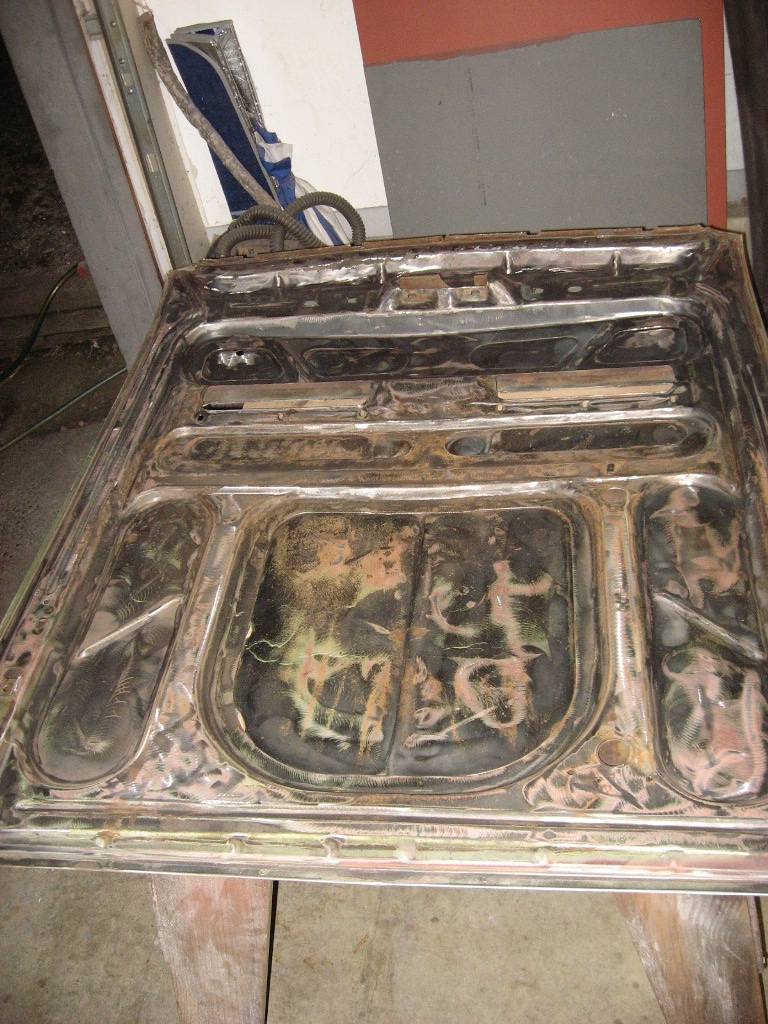
Here's what the next few evenings of work looks like. See the rust holes along the front support?

I started on the passenger side by just cutting away the rusted portion. While this was off, I took the opportunity to hammer and dolly out a dent that was in the hood at the front that the PO had filled with bondo.

I then (poorly) welded in a patch. The problem is that I welded the support frame member edge before I tacked the front flanges together. I'll let you know why this was a problem further on.

For the driver side, I did things differently, hey! this is all experimental to a newby like me! This time I made a flange in a patch first and then clamped that flange to the front edge of the hood and then hammered the patch down over the existing, rusty metal to form it.

Then I marked around the new patch edges to determine where to cut.

I cut out the bad metal and then etched and primed the inside surfaces.

This time, however, I tacked the front flange first and then finished bending the patch down to accurately meet up with the reinforcement member. See the passenger side patch sticking up there? If I had forced that patch back down in the front to weld the flange, the top of the hood wanted to warp. So, back to the drawing board for the passenger side as I cut the patch back out again.

The problem is that I couldn't make a patch the same way as I had done the driver side (soooo much faster and cleaner than hand-forming the patch) because I had cut away the metal already that I would use to form the patch. Old hood to the rescue! I clamped a pre-flanged sheet to the target area of the other hood...

... and then hammered out another patch.

This time, I welded it in like I had done to the driver side. Flange side first.

Here's the complete repair.

I ground down the welds...

... and leveled it with some polyester glazing putty and sanded it smooth with 220.

I originally was going to leave underside of the hood as-is and just primer over the old paint but decided that I'd give one of these 4.5" composite stripping discs a try. I'd used the ones made for drills but never for an angle grinder before.

It did a pretty fast job of taking off most of the remaining paint and primer.

But you need to watch that little bugger near sheet metal edges. A sheet metal edge will cut into the soft composite stripping pad and then the angle grinder will twist up edge. I had to carefully hammer this down by inserting a wide bladed putty knife between the hood skin and the damaged edge to keep from dinging the hood.

Those hood pin holes had to be welded shut and ground smooth.

The entire bottom side was etched with Ospho, rinsed, and then cleaned with metal prep (giving the metal that white, chalky look). Also, new seam sealer had to be injected between the support and hood skin because the old had pulled away causing the top of the hood to "oil can".

Finally, I can get to resurfacing the top of the hood. I scratched it up good first with a course sanding disk and then cleaned the metal with metal prep.

I laid down a thin layer of skimming filler like I'd done with the deck lid.

And then I sanded... and sanded.... and sanded.... and filled some more... and sanded... and sanded some more. By the way if you see this kind of sand paper at Harbor Freight RUN AWAY! This is the worst crap I've ever used. Besides being completely worthless as sand paper, the glue is actually water soluble. A little bit of sweat or water on the paper makes it dissolve and fall apart. However, if you get the black crud on your hands then nothing will clean it off. Ack! I tossed the whole bag in the trash.

Fortunately, I had good 3M paper on hand as well and was able to finish the sanding. As I'd done with the deck lid, I roughed the skimming putty with a 46 grit 17 inch idiot board, getting it as level as possible and then skimmed the whole thing again with a microscopically thin layer polyester glazing putty. Just enough to fill the 46 grit sanding scratches. I wet sanded that directly with 220 (NOTE: I found out later that it is bad to wet sand filler as it can absorb moisture and cause problems with paint later), wiped it down, dried it, checked for imperfections, filled those as I found them, sanded again, rinse, repeat until done.

When I was finally ready to primer with DP40LF epoxy primer, rain was on the way so it was now or wait for another four days or so. It was getting dark out so I opted to hang the hood from the garage door and spray it from inside the garage. Top first.

And then bottom.


Yeah, the straps got in the way at times but I worked around them and got the job done with a couple of flaws that I still need to fix but I got it done. Now, on to cleaning up the hood hardware for test mounting to the car for panel alignment.
Wow, great work! I am really inspired by the progress you are making on this car. You make it look easy! I am working on a '70 Mach 1 that is currently stripped down in my garage. Really more like not working on it but it is there. I need to finish up a cowl repair, then I am replacing the inner fenders... need to do both rear quarters after that. I have already done floorboards, torque boxes, and front frame extensions. Fun stuff huh? Keep up the work, I am learning from you!
ReplyDeleteThanks Darren! I'm glad the blog is helping. I just hope this doesn't become a case of the blind leading the blind. LOL! Sounds like you're almost done though. Get back in there!
ReplyDeleteHey Alex - This is sooo cool. I just bought a similar hood from a guy in my Mustang club, so you saved me hours of trying to figure out what to do with it (again!). I hope you don't think I'm just going to copy everything you've done...!
ReplyDeleteHaha, no problem, but looking through your blog, it looks like you're blazing plenty of trails of your own. ;-)
ReplyDeleteHi Alex, been a while since I've been here. Hope you didn't miss me too much :).
ReplyDeleteAnyway, as always a completely enjoyable and entertaining read. That looks like an excellent repair job on the rust. My original bonnet (oops, that's right, you guys call them hoods - ha ha) was so much worse than yours. If mine had been only as bad as yours I may well have salvaged it but it was always going to be so much easier to buy new repro - that's me, always taking the easy way out... although I can be a bit of cheap b&*#ard as well.
Keep it up and look forward to your next post.
Thanks Mike! Honestly, if it were just a little bit worse, I would have bought new repro hood instead so I think you took the right path.
ReplyDeleteYou know when i have a problem with a body part in my 68 coupe, before i think about buying i check your blog. you really give us do it your self'ers and idea as to what to do. you have saved me alot of money. please keep posting your progress. you truly are an inspiration.
ReplyDeleteThank you. I'm glad this blog has been of some help to you.
ReplyDelete