Walk with me in my journey to restore a 1968 Ford Mustang Convertible.
Adsense review
Sunday, June 24, 2012
It's ALIVE!
After I had dropped in the engine and transmission, the task of hooking up all of the odds and ends. A couple of the more odd ends were the transmission cooling lines. Like the Fuel and brake lines on this car, they were patched together and poorly bent with kinks. A new set of lines is around $40 from various parts houses plus oversize freight charges. So, of course, I went down to my local NAPA and bought 5/16 brake/fuel line for about $12 and a tubing bender from Harbor Freight for $7 and set to making my own based roughly on the crappy set I already had. Yeah, they're not concourse by any stretch of the imagination but they were cheap!
Old crappy trans cooling lines.
Newly bent lines (trans end)
Newly bent lines (radiator end). I was just using my old radiator to fit the lines.
Speaking of crappy old car parts, I had cleaned up my original radiator in preparation for paint. Just for giggles, I rigged up my garden hose to pressure test it and I'm glad I did because my test exposed a crack in the top tank. I found a guy here locally whom still repairs radiators and offered to rebuild my original for $150. I thought this was a great deal because he would also "rod" it and test it further so I could have an original radiator with original part numbers AND peace of mind. I called him a couple days after I dropped it off and he gave me the bad news that even with a new upper tank the core was beyond saving. I had a choice between doing a core replacement for $240 or buying a brand new radiator for $200 so I opted to give up on the original and get a new one. I brought it home and hooked it up with new concourse hoses I had previously purchased but used modern clamps since the correct original wire-style clamps were $8 each. I figured I could buy those at a later time and swap them out without draining the coolant whereas replacing the hoses later would.
New Radiator
New radiator, hoses, and trans cooling lines.
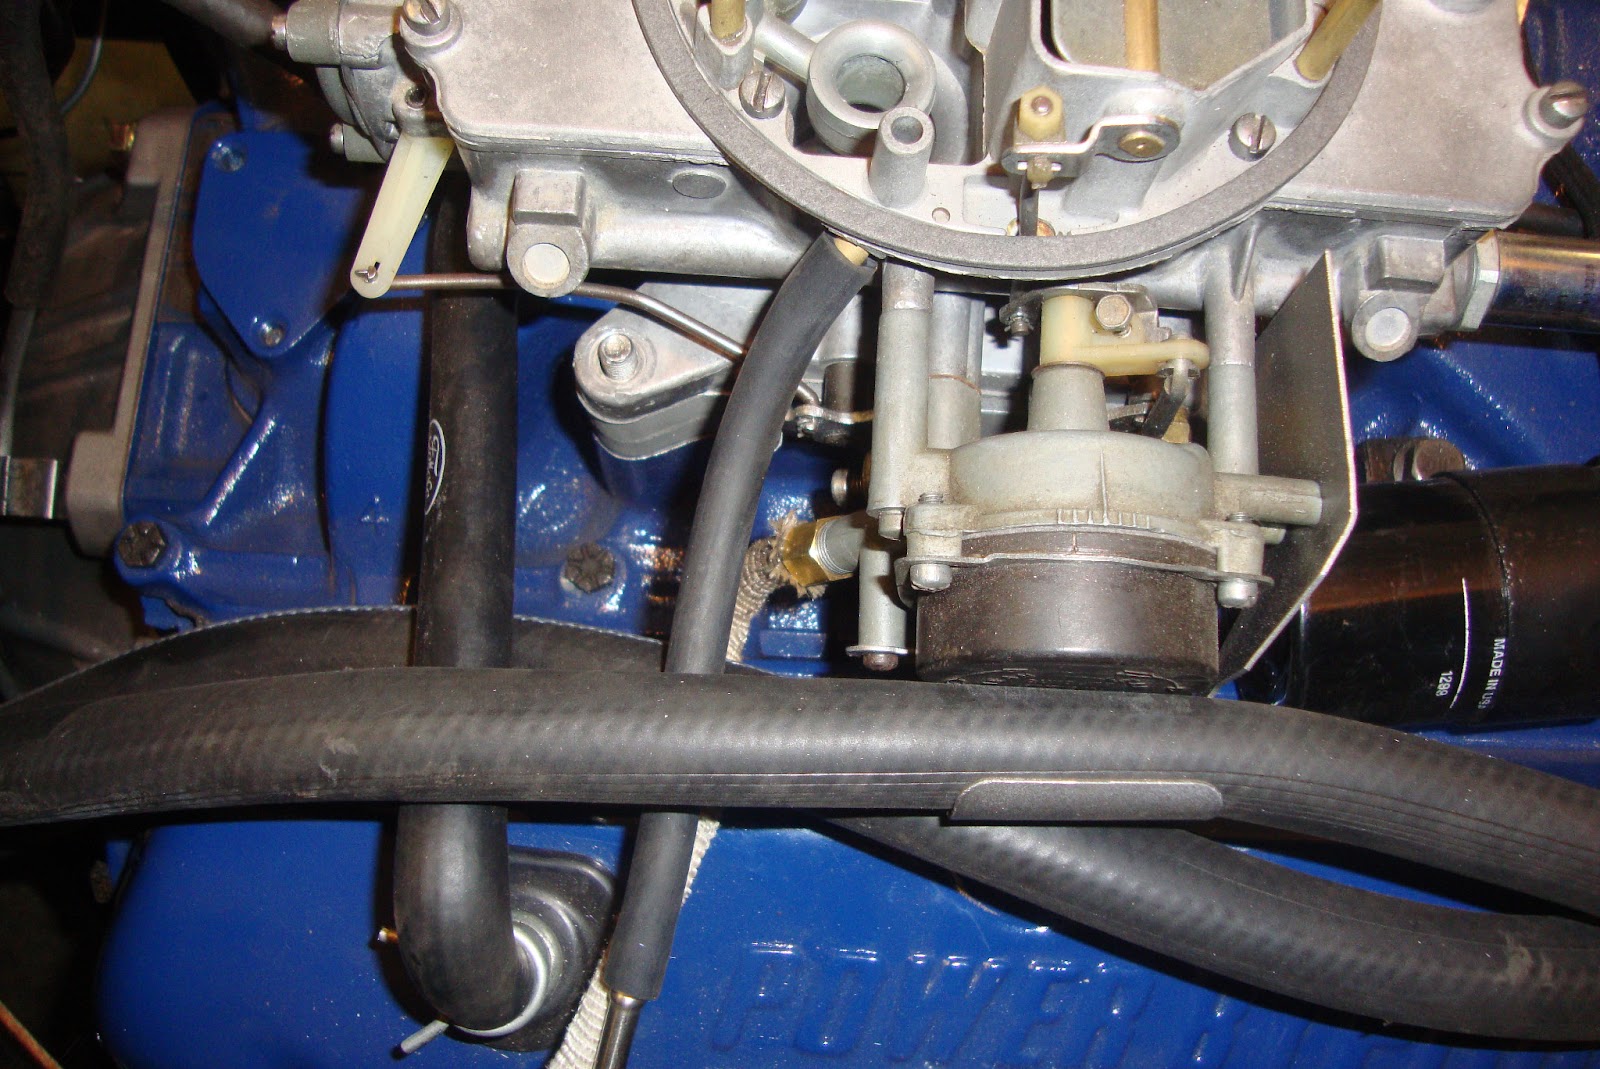
I was putting the install of the carburetor off because I was nervous about my float settings and adjustments. Finally, I decided that stuff could always be adjusted when it's on the car so I threaded in the carb mounting studs and slapped a Fel-Pro gasket against the intake. The spacer plate and PCV hose was dropped on followed by another gasket. I threaded the choke heat tube onto the choke housing of the carb and placed it on the studs being careful to insert the lower heat tube nipple into the passenger exhaust manifold and fitted the choke cold air tube to the top of the carb. The upper heater hose was fitted stuffed into its clamp next to the choke housing and the throttle linkage was hooked up to the throttle control. I'm using my original AutoLite 2100 throttle spring and bracket but will be getting the correct parts later.
Finally, to complete the engine build, the distributor wires were routed to their appropriate spark plugs.
Carb studs and intake gasket.
Carb spacer and carb gasket.
The carb.
Choke heat tubes and upper heater hose.
Manifold shot of the choke heat tubes.
Engine ready for start-up.
All that work on the transmission cooling lines is wasted if I don't have something for the transmission to do. Something like, I don't know... maybe spin the rear differential? I went to the shed and dug out my old drive shaft. I don't know much about drive line lore except for this; a 68 Mustang with a 289 driving a C4 and sporting a stock 8" rear diff uses two different u-joints. The front is a #429 and the rear is a #430. The front (429) has 1 1/16" diameter caps whereas the rear (430) has two 1 1/16" and two 1 1/8" caps.
The rear of the drive shaft is the end with the rubber isolator and the smaller caps (1 1/16") of the #430 u-joint are pressed into the drive shaft leaving the larger caps to be clamped to the rear diff pinion. The front u-joint is simply pressed into the drive shaft first and then the yoke is installed the same way. It doesn't matter which caps go in which part in the front yoke assembly. The drive shaft can then be installed in the car by first inserting the yoke spline into the extension housing of the transmission and then seated in the diff pinion and clamped in. The pinion has ridges on the outside edge that keeps the caps in position so clips are not necessary on the two large caps.
Using a bench vice to press the caps onto the new u-joints.
Using a socket to push each cap in enough to put on the clips.
Rear u-joint.
Drive Line in place.
Next, I cobbled together the original single exhaust and bolted its Y-pipe to the headers. It's rusty, leaky, and ugly, but I can't afford my planned dual-exhaust yet so it's going to have to do. I didn't snap pictures because they would just depress you.
I was finally to the point of pouring the first four quarts of oil into the engine and pouring the first 2 quarts into the transmission (in addition to the 2 in the torque converter). The radiator was also filled with a 50/50 mix of coolant and about a gallon of gasoline was poured into the gas tank. I checked for leaks and found a slow drip at the front of the transmission pan. A few strokes of the wrench and it sealed up.
I disconnected the coil and cranked the engine over about 10 times to pump some fuel up the line and to move the oil into the pump to begin lubrication. This was enough to fill the oil filter so I added the final (5th) quart of oil to the engine and topped off the transmission and coolant. Nervously, I called my wife out to witness and cranked the engine over. Nothing. I poured a small amount of gasoline into the carburetor and tried again. It caught, missed, caught, fired, died, caught, and finally fired up... very very roughly, like it was missing on a couple of cylinders. I shut down and went and inspected the carb, distributor, and distributor wires. Whew! I found that I had mixed up 1 and 4. I swapped them and fired it up and she came to life with authority. Clean, with no missing cylinders. WOOT! I set the carb for a high idle, about 2000 RPM and settled in for some serious cam-break-in time. That's about when my wife yelled, "TURN IT OFF!". I scrambled for the key yelling, "What!? What!?", fully expecting to see a fire or something at which point she pointed at the coolant blowing out of the radiator. I didn't put the cap on because I wanted to add coolant as it started circulating. I put the cap on and started it and brought it up to about 2000 RPM again to complete the break-in and it started blowing coolant out the overflow and all over the garage floor. WTF? I removed the radiator cap and placed a funnel I had made out of an oil can into the filler and watched bubbles burp up the funnel and the level would drop and then rise again as another bubble came up. Ahhh... it's burping the air out of the engine block. I just left it to burp for another 5 mins and then topped off the coolant and started it again but this time with the overflow feeding a gallon jug as I fully expected it to occur again until the block was fully burped. I fired it up yet again and held it at it's 2000 RPM for a good 30 minutes with no sign of further overflow (undoubtedly because I was ready for it). My wife then snuck in with a video camera and recorded the less exciting moments of break-in which I will share with you here.
After the cam break-in period, I shut it down, topped off the fluids again, and decided to try to test out the transmission by taking a spin around the cul-de-sac. It was working out pretty cool until I got about 3/4 around and the engine died and wouldn't restart. Evidently, had I used what little gas I put in the tank on the break-in and my hilly driveway and cul-de-sac starved the engine. I had fun while it lasted though. Notice the cool new sequential brake-lights about half-way around. Here's a VMF thread I found AFTER the break-in. There seem to be a lot of tips.
As alaways great job!!! I was wondering if you could post a short video showing your new tail light at work?? i would liek to see the difference. Thanks :)
Way to go! It is a great moment to put the key in and start it. My guess is there are many of us watching your project and wishing our project was at this stage, true for me.
Keep up the blog, I have enjoyed reading about your project.
Congratulations! There's nothing more satisfying than to turn that key and have it come to life. I've really admired your work. You must be very proud of what you've accomplished!
I rebuilt my engine a few years ago, and decided to run headers on it. I didn't have an exhaust system other than the open headers, and when I started that engine for the first time and ran it at 2 grand for twenty minutes or so, the neighbors came outside to see what was so loud. Like you, I was grinning from ear to ear.
Wow man! Congratulations! After following the blog for so long it's awesome to see you get it fired up and even cooler to see it roll under it's own power. The grin on your face made my day. Great work Alex!
Alex, Congrats! You're not far from being done. The engine sounds nice too. Your blog has provided much helpful information for many of us that are far, far away from your milestone. But one day.....I'll be there too.
Thanks Dennis! I hope this blog helps others like yourself avoid too much wasted time and helps keep you motivated to complete your own project. I can't wait to see what you do with your fastback next.
I'm planning on doing some work over the weekend. It's supposed to finally get into the 80's for temps here Saturday and Sunday. I'm getting tired of 90+ temps (21 days in a row counting today) and .09 inches of rain since June 1. It's been too hot to work in the garage and I had to fix the AC in my car--compressor, drier, and expansion valve. : /
Mate, great read. My car is in almost the same stage. 4 weeks ago, the missus cranked the motor (390) for the first time while I fiddled with the carb. Scared the crap out of me when it fired on the second crank. Today was the first drive out of the shed and it was great- like you minus two guards and a bonet. Keep up the docu. Cheers From Ausjacko Down Under


Congratulations! Wonderful sounds !
ReplyDeleteThanks Risto!
DeleteI swear you do this stuff just to tease me! You are hitting this thing with enviable effort and everything looks great! MORE MOVIES!!!!!!
ReplyDeleteThank Sven! LOL! I could upload the one with the coolant spraying out of the radiator, that would be pretty entertaining. ;-)
DeleteVery nice! I would have drove down the block :-) When you add a video to the blog it's even more fun! Congratulations!
ReplyDeleteThanks James! LOL! I thought about it and am now glad I didn't. :-)
DeleteGlad you enjoyed the vids.
I mostly enjoyed the running out of gas part:)
ReplyDeleteSteve
LOL! Did it just for you. ;-)
DeleteCongrats Alex - a super milestone - I'm envious!!!
ReplyDeleterj
Thanks RJ!
DeleteAs alaways great job!!!
ReplyDeleteI was wondering if you could post a short video showing your new tail light at work?? i would liek to see the difference.
Thanks :)
Thanks! I most definitely will post a video of the brake lights once the car is assembled. Should be sometime early next week.
Deletegreat, thank you
DeleteWay to go! It is a great moment to put the key in and start it. My guess is there are many of us watching your project and wishing our project was at this stage, true for me.
ReplyDeleteKeep up the blog, I have enjoyed reading about your project.
Bob
Thanks Bob! Turning that key for the first time is a scary event. My wife jumped a foot when it fired up! LOL!
DeleteCongratulations! There's nothing more satisfying than to turn that key and have it come to life. I've really admired your work. You must be very proud of what you've accomplished!
ReplyDeleteThanks John. Your kind words are much appreciated.
DeleteI rebuilt my engine a few years ago, and decided to run headers on it. I didn't have an exhaust system other than the open headers, and when I started that engine for the first time and ran it at 2 grand for twenty minutes or so, the neighbors came outside to see what was so loud. Like you, I was grinning from ear to ear.
DeleteLOL! That must have been something to see.
DeleteAnd something to hear. One of the most beautiful sounds in the world.
DeleteWow man! Congratulations! After following the blog for so long it's awesome to see you get it fired up and even cooler to see it roll under it's own power. The grin on your face made my day. Great work Alex!
ReplyDeleteThanks Jeremy! And thanks for supporting this blog for so many years. Comments like this is what keeps me motivated.
DeleteAlex, Congrats! You're not far from being done. The engine sounds nice too. Your blog has provided much helpful information for many of us that are far, far away from your milestone. But one day.....I'll be there too.
ReplyDeleteThanks Dennis! I hope this blog helps others like yourself avoid too much wasted time and helps keep you motivated to complete your own project. I can't wait to see what you do with your fastback next.
DeleteI'm planning on doing some work over the weekend. It's supposed to finally get into the 80's for temps here Saturday and Sunday. I'm getting tired of 90+ temps (21 days in a row counting today) and .09 inches of rain since June 1. It's been too hot to work in the garage and I had to fix the AC in my car--compressor, drier, and expansion valve. : /
DeleteMate, great read. My car is in almost the same stage. 4 weeks ago, the missus cranked the motor (390) for the first time while I fiddled with the carb. Scared the crap out of me when it fired on the second crank. Today was the first drive out of the shed and it was great- like you minus two guards and a bonet. Keep up the docu.
ReplyDeleteCheers
From
Ausjacko
Down Under