Last I left off, I didn't have the proper fuel pump eccentric cam. The one I had was too wide and would rub against the timing cover. The following Tuesday I called around and no auto parts stores carried such things. I called my machine shop and he was able to get me a used 2 piece eccentric so I jumped on it and picked it up. The 2 part eccentrics are .011 inches narrower and provide plenty of clearance for the double roller timing chain sprocket.
I installed the eccentric bolt with a dab of thread locker, lubed the chain and set to installing the timing cover.
 |
| Timing sprockets, chain, and eccentric all ready to go. |
The timing cover was a mess with 2 broken bolts in it. I was able to remove those with creative application of a torch and clean up the cover with my angle grinder spinning a wire wheel plus some time in the blast cabinet. After cleaning it up, a new seal was pressed in, the outside of the cover was painted Duplicolor 1606 (Ford Dark Blue), and the gasket was sealed on. I also took some extra time to media blast the cover bolts and give them the
phosphate and oil treatment. Finally, the cover was mounted to the block. I used Permatex Ultra Black RTV for all gasket surfaces. My primary concern was for zero leaks but if it needs to be disassembled while the engine is on the car, I might be in for some hard times. I tried to paint the gasket with very thin coats of the RTV, not just squishing beads between the gasket and surface. I don't know if anybody should follow my lead on this tactic but it feels right. Also, the bolts that passed into the block had their threads coated with a teflon paste type of thread sealer.
 |
| New gasket and oil seal. |
 |
| Phosphated bolts and primered timing pointer. |
 |
| Timing cover installed. The odd bolts with the plastic bits are temporary to allow gasket sealer to cure while awaiting the water pump |
Next comes the oil pump. I got a new one in my master engine rebuild kit but I had to clean up the oil pickup and buy a new oil pump drive shaft. The new assembly was installed and torqued down.
 |
| The new with the old. |
 |
| Pump installed. |
Now that the oil pump and timing cover are on the block, the oil pan could go on. My oil pan was pretty ugly so I spent a few hours cleaning it up with degreaser, wire wheel, lacquer thinner, and phosphoric acid, and then painted with Duplicolor Ford Dark Blue. Also, I did the phosphate and oil thing for the pan bolts as well. The pan gaskets were stuck onto the block with my Permatex Ultra Black method. Although I chose to use sealer between the pan gasket and the block, that may have not been the best idea if ever the pan has to be removed while in the car. Should have researched this more before doing it.
 |
| The inside of the pan before cleanup. |
 |
| The outside of the pan before cleanup. |
 |
| Cleaned up the inside. |
 |
| Cleaned up the outside. |
 |
| Painted Duplicolor Ford Dark Blue |
 |
| Gaskets and seals on the block. |
 |
| All the pan bolts torqued down. |
Next up is the water pump. I seriously considered just buying a new one but upon inspection, although the exterior looks pretty nasty, the impeller turns smooth with no play in the bushings and shaft so I chose instead to clean it up and reuse it. Also, the part number on the housing "P68" lead me to believe that it was an original pump but now I'm thinking it's an aftermarket of some kind. Oh well, it still cleaned up nicely after wire brush, blast cabinet, and phosphoric acid (pump interior was masked off). The back plate was removed to scrape away the old gasket and to inspect and clean the interior. The gaskets were replaced and the pump was bolted onto the engine. The old bolts couldn't be restored like the timing cover since they were pretty badly rusted so I had to buy some Grade 5's from NAPA. I blasted off the nickle coating though, and gave them the phosphate treatment.
 |
| Before clean up. |
 |
| Removed the back plate to inspect interior. |
 |
| Cleaned up somewhat before phosphoric acid treatment. |
 |
| Painted. |
 |
| Interior cleaned up and gasket attached. |
 |
| Backing plate bolted back on with fresh gasket. |
 |
| Pump installed on timing cover. |
I was originally going to clean up the harmonic dampener but I really didn't like the look of the rubber ring that separates the hub and outer ring. If it were simply cracked and dried out, I would probably reuse it but I felt better buying a new one. The one I got is a Scott Drake and was $99. I probably could have gotten away with reusing the old one. One guy told me that he throws them away when they can't hold the correct timing marks anymore. The outside ring will eventually spin freely making the timing marks on the edge useless! Since I went as far as blowing 100 clams on this one I wasn't going to just let it rust away like the old one. I gave it a couple of coats of clear coat and torqued it onto the crank shaft.
 |
| The old with the new. Check out the rubber ring on the old one... yuck. |
 |
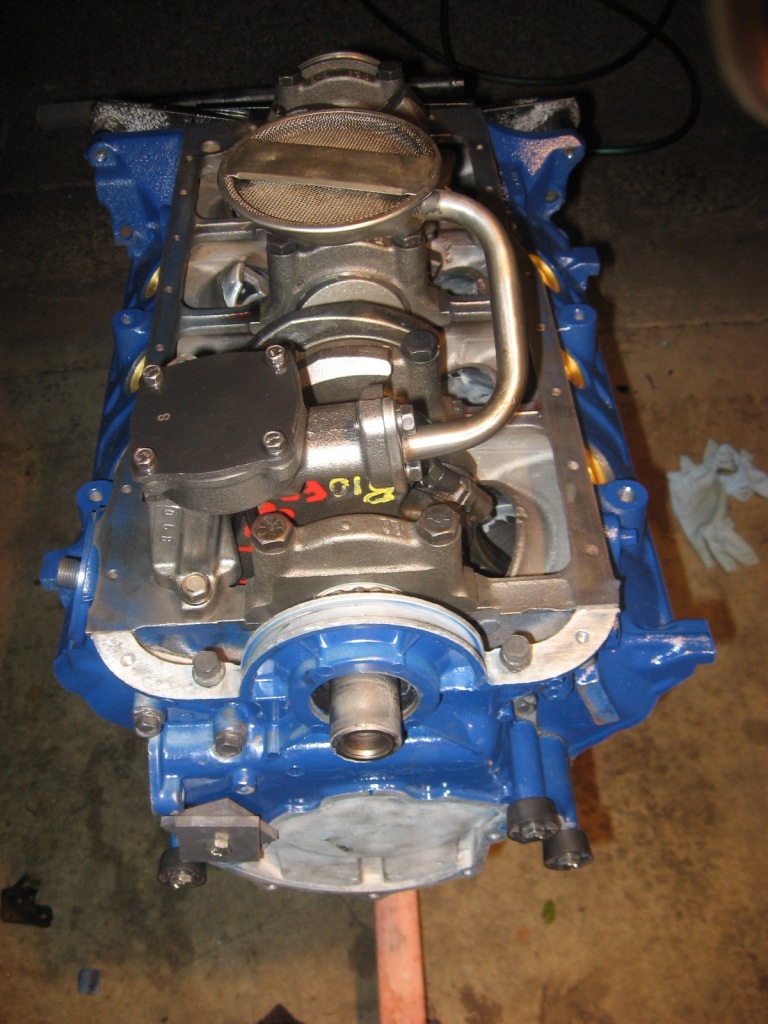
| The engine as far as I got as of this blog entry. |
The heads are up next. I'm going to take them to my machinist for inspection and cleanup. More to come.


that's great work, and you're making excellent pogress...can't wait for part 5 :)
ReplyDeleteHey Alex, coming along nicely. I am still yet to reassemble my engine although all the machining has been done. I also had to have my heads converted to run on unleaded fuel as is the case here in Australia. I was close to going for a new harmonic balancer also however was convinced (by a trustworthy source) that mine was perfectly okay to continue using. The rubber did look a little dried and cracked but not overly so...
ReplyDeleteThanks guys! Yeah, the machine guy said he'd have to see if the valve seats have been smashed in. If they have, and I need new seats anyway, I'll get the hardened seats. If they look fine, I'm just going to leave it them as they are. I was going to find a used balancer in better condition but the seller wanted $60 for it so I just went with a new one. I think generally, they're good to go until they lose their timing. I don't think they catastrophically fail or anything like that.
ReplyDeleteLooks like everyone was a bit busy this weekend. Very cool to follow everyone's progress. You'll be running in no time now with just the heads to go.
ReplyDeleteAwesome work Alex!
ReplyDeleteAlex,
ReplyDeleteYer makin' me soooooo jealous!
Thanks all!
ReplyDeleteHey Alex,
ReplyDeleteWhat method did you use to clean all the paint off of the oil pan?
Thanks
I used my angle grinder swinging a 4.5" knotted wire wheel. One of those composite paint stripping wheels would work well too.
ReplyDeleteAlex, Looks like quality work to me. Wanna do mine for me? ; )
ReplyDeleteLOL! No thanks Dennis. :-)
ReplyDelete