Okay so here we go again. I've put the blog off for so long in favor of flat-out working on the car that I'm WAY behind so we're going to play a whirlwind game of "catch up". Long-story-short, I've had the car on the road for about a week so even with this update, this blog still isn't fully up to date... but it's a start. The sad fact is that I've been working so hard on just getting it on the road before the end of Summer that I've cheated this blog on my standard method of picture overload. These entries are pretty much all that was on the camera so you can imagine that there's a bit missing between the last entries here and a street-legal car but I'll try to make it up in some way. I've delineated this post into several sub-sections each dealing with an aspect of the build. I had taken pictures intending to go into a full step-by-step on each task but have gotten so far behind that I'm going to take a more abbreviated approach so please bear with me.
The Windshield
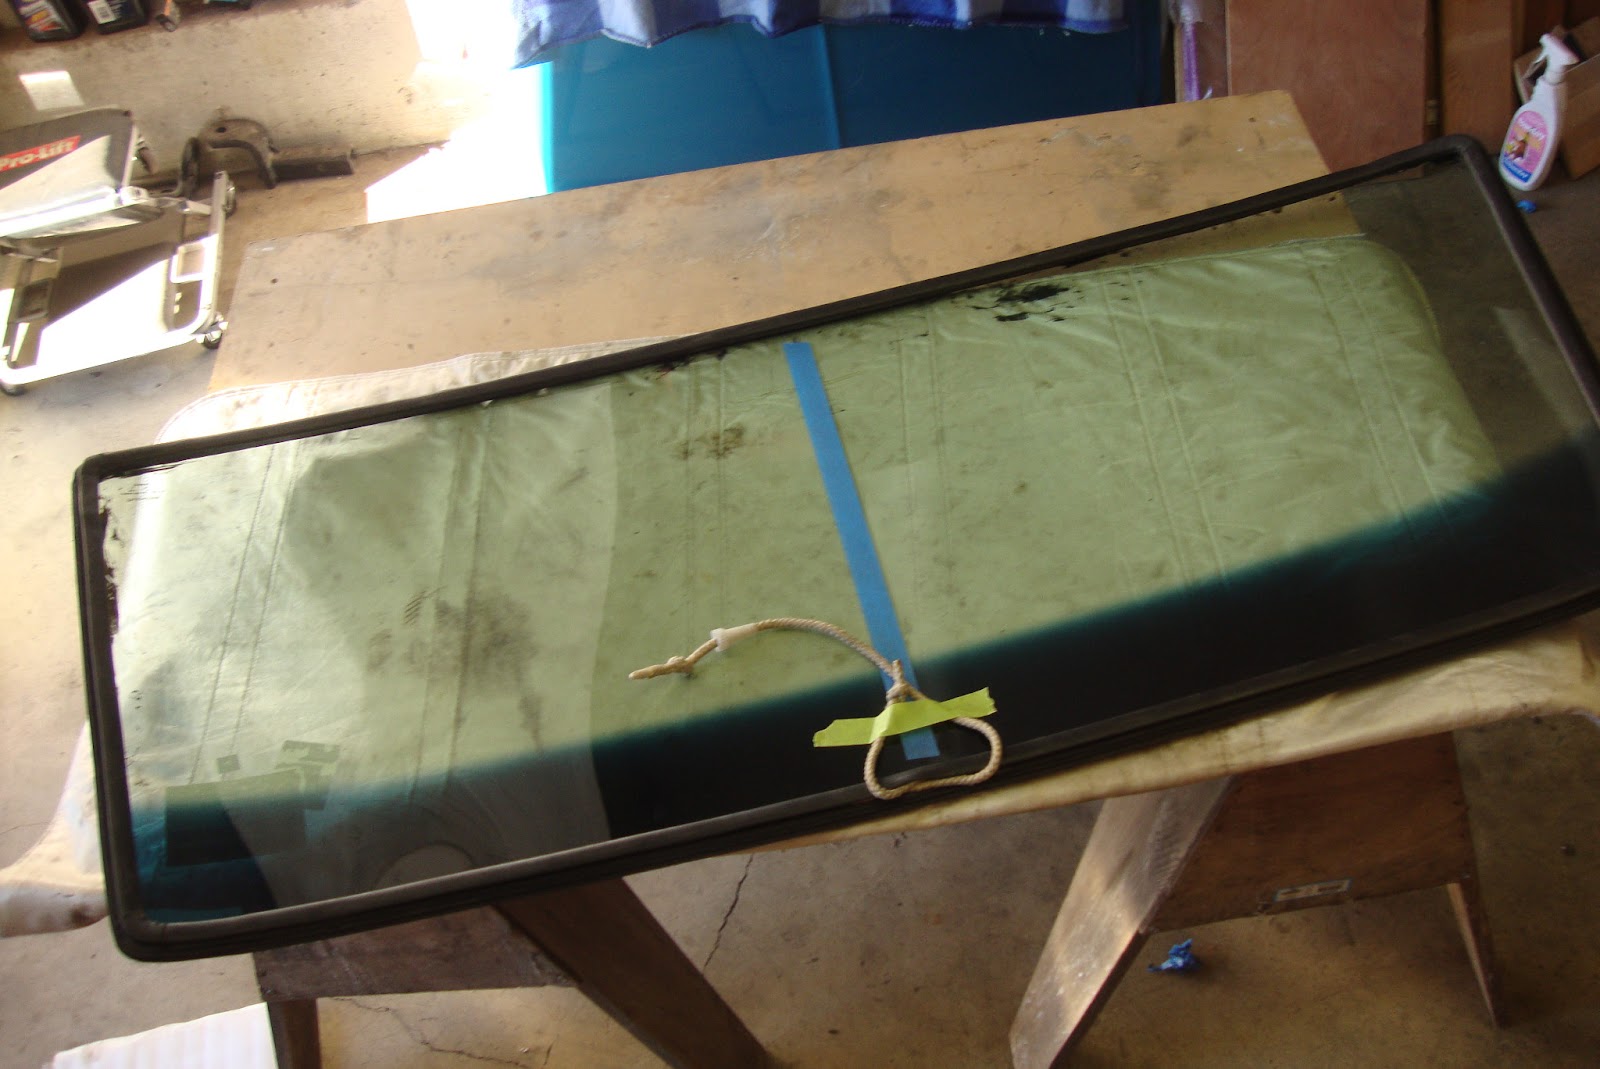
I bought the windshield from a local glass supply for $125. This is not a Carlite brand or concours by any stretch of the imagination but it is good at one thing, letting me see out of the car while keeping the bugs out of my teeth. I looked at more correct windshields online but couldn't see paying an extra hundred bucks for the Carlite logo plus truck freight. I bought the
most expensive gasket from CJ Pony Parts which happened to be a Daniel Carpenter brand. It went on like a glove and sealed like a champ. My references were a
Mustang Monthly , a thread on
AllfordMustangs.com,
THIS YouTube video, and T
HIS YouTube video that was my primary reference. I bought the
CRL "window weld" butyl from CJ's. This is NOT the same window weld that is urethane so don't freak out like I did. This is Butyl just like the 3M 8509.
 |
| The old and the new. The mirror button is 4 1/16" down from the top edge of the windshield... oh, and upside-down on my old windshield so don't install it like this. The ball should face down. |
 |
| I covered the dash pad and the cowl and marked the center line. Covering everything is a MUST as the butyl sealer will get everywhere. Luckily it cleans right up with mineral spirits. |
 |
| This is how the gasket is oriented on the glass. The narrowest portion faces out. You should see the largest portion of the gasket inside the car through the windshield. |
 |
| The trim clips just snap over the studs on the windshield frame. Do this FIRST. |
 |
| I made a tool out of 14g sheet. Tuck in in like this and push down while whacking it in and it will snap in place. Not enough force downward at the same time and the clip will shoot off across the shop. |
 |
| This is the butyl sealer I used. Most normal people use 3M 8509 but this stuff is pretty much the same. |
 |
| The gasket is on. I squirted a small bead on the inside groove between the glass and gasket while working it on around the perimeter of the glass. |
 |
| I ran the rope around the outside groove using a caulk gun nozzle as a guide like the guy in the video linked above. If I were to do this again, I'd start/end the rope at the BOTTOM of the windshield. This is because the weight of the windshield pushes the frame against the groove at the bottom and makes the roping easier. From the top, I had to have my wife lift the windshield up against the flange while roping it in and that sucked. |
 |
| After roping the windshield in, I was liberal with the butyl sealer around the perimeter and especially around the molding clips. |
 |
| Done. The mess was wiped up with mineral spirits followed by glass cleaner. |
Fender Prep
As long as the fenders were off the car, I could spray undercoating inside without having to contort around the wheel. I masked off the areas that might catch overspray and bombed the heck out of it. I also installed the side marker lights and the splash shields.
 |
| Masked off and splash shield installed. |
 |
| Undercoating away! I stopped just past where the rear splash shield would contact the fender. |
 |
| Installed the side marker lights. |
 |
| Rear splash shield in place ready to accept the fender. |
|
The fenders were then installed and undercoating sprayed behind the wheels and over the rear splash shield.
Hood Signals
The hood turn signals were fairly straight forward. The grills had to be installed in the signal housings first via little clips. The housings were then placed into the hood openings from the top side and the nuts threaded onto the studs. Two of the studs were used to hold the lights themselves onto the grills. The wiring harness was clipped to the hood from the passenger side over to the driver side and then through the driver side frame and out the back side of the hood. A ground strap was screwed into the front of the cowl and the harness was connected to the only open lead hanging out of the firewall.
Front Bumper
My only regret for the front bumper is that I had to re-use my original bumper due to my low budget and high desire to get on the road. The old bumper has some chrome problems and I don't intend to keep it for long. In fact, I intend to replace both bumpers when possible.
I was a little worried about this step because I had replaced the front outside frame rail including the mounting points on
left and
right sides of the car. It turned out that the mounting points worked out well and the bumper went on fine. I refurbished 3 of the 4 brackets. The one bracket I bought new took more work to fit than the other 3 combined because it wasn't bent right to fit where it needed to be inside the bumper so I had to reshape, weld, and grind it to get it to fit so the square bumper bolt holes would line up. Before installing the bumper, however, I installed the grill. I regret that I didn't document the grill install though because it was fairly complex and would have made a good walk-through. Also, the lower front molding needs to go on before the bumper and valance because access to the studs behind the rock guard is needed. After all of that goes on, the bumper can be bolted on.
 |
| The bumper brackets from the inside. |
 |
| How the brackets look from the outside. |
 |
| This damned thing had to be completely reshaped in the front. |
 |
| The bumper bolted to the brackets. I show the bumper also bolted to the front side of the fenders but after fiddling with this awhile, I recommend waiting to tighten those fender to bumper bolts until after the valance is aligned and bolted to the fenders. |
 |
| I found it easiest to access the fender and valance light connectors if routed this way. |
 |
| The underside of the stone guard with shot of molding mounting studs. |
Front Valance Prep
The front valance has two turn signal lights embedded in it. The external housings are painted body with a light and internal housing on the inside. I ran some strip caulk around the lip of the external housing to prevent rattling. The light is then inserted in the external housing and the internal housing is bolted on over that holding it all together. The front valance is attached to the car with ten bolts. Then valance guards are bolted to the inner L bracket of the inner fender bracket (huh?) and then up into the front of the frame rail sharing a bolt with the lower mounting points of the valance. Finally, the fender attaches to the valance via 2 hidden bolts on each side. This ties it all together and gives the front end some structural integrity. Now you can tighten up the front bumper to fender bolts (but not so tight that you warp the fender).
 |
| Front turn signal parts. |
 |
| Strip caulk. |
 |
| Light inserted into the external housing. |
 |
| Internal housing bolted to the light. |
 |
| Lights! |
 |
| The valance guards are bolted to the inner bumper bracket at the top... |
 |
| ... and the bottom of the front frame rail below. |
 |
| Front Done. Yuck.. could use some new chrome here. |
It's at this point where I drove the car down to my local Les Schwab for a front-end alignment. I gave the alignment guy the specs for the
Arning drop and expected some resistance but received none. He did a good job and the car handled great on the way home. Not bad for $57. I couldn't have bought an alignment tool for that.
Deck Lid Weatherstrip
On my way home from the aforementioned alignment, I kept hearing an annoying rattling noise coming from the back end. I realized that it was the deck lid bumping up and down against the latch which brings us to the next task, installing deck lid weatherstrip. I've had this weatherstrip for years and it turns out to be Scott Drake brand. I was worried about it after reading how Scott Drake is too stiff and holds the deck lid too high but I found it to be quite reasonable. Regardless, the commonly accepted brand for weatherstripping is Daniel Carpenter. I think part of the problem people have with Scott Drake is that the weatherstrip comes with the two inside lips bonded together which gives the weatherstrip too much structural integrity. I separated it my running my thumb along the inside groove. The opening goes to the inside. There's a top and bottom to the weatherstrip with the more rounded edge going "up" against the car while the flat edge with a squared off corner goes against the deck lid. The weatherstrip is supposed to start and end at the latch. Basically, you spread a thin layer of weatherstrip adhesive on the deck lid and another on the weatherstrip and let it dry (after cleaning both with alcohol or such). Then run a fresh bead on the weatherstrip and stick it to the deck lid. Don't try to do it all at once. Just short sections at a time. I did six sections; two on each wide edge and one on each narrow edge. The deck lid was then mounted and realigned. Yes, it took some extra force to close it but I didn't feel like it was holding the deck lid higher than the rear quarters.
 |
| Ready to go. Clean the weatherstrip and the deck lid with alcohol or such. |
 |
| I split open the weatherstrip by running a thumb along the groove. |
 |
| Start and end at the latch. |
 |
| Wait for it to dry and then apply a fresh bead on the weatherstrip and stick it on. A little at a time. |
 |
| Finishing up. Some adhesive on the ends. |
 |
| Closed. |
 |
| Done. |
Floor Prep
I had previously purchased a box of
RAAMat brand butyl sound deadener. This is similar to Dynamat but a cheaper alternative. I had also purchased a box of the original style asphalt sound deadener and a roll of Reflectix heat shield from the local Home Depot. The purpose of the buty sound deadener is to absorb vibration of large, flat sections of sheet metal thus decreasing cabin noise. The heat shield is to prevent the exhaust heat from permeating through the floor and cooking my toes and the factory style underlayment was... well... just overkill I think, but I already had it on hand soooo...
It doesn't take much butyl to do it's job even though you'll see Overhaulin' and other folks covering the entire floor with it but it's my understanding that it's not really necessary but it is expensive so I took a more economical approach. The butyl is attached by just peeling off its wax paper and sticking it down. Once stuck, it's fairly easy to cut with a razor knife to get it to lay down into indentions. The Reflectix is just glued to the floor and RAAMat with 3M contact spray adhesive and the factory underlayment is just layed down between all that and the carpet. The underlayment has a bare asphalt side and a cloth type backing. The weird thing is that some pre-cut pieces fit with the bare side up and others with the bare side down.
 |
| The floor before |
 |
| RAAMat stuck on |
 |
| More RAAMat in the trunk. |
 |
| Reflectix glued down I had plenty of this so I covered the whole floor. |
 |
| Factory style underlayment No consistency to which side is up or down. just fits how it's cut. |
 |
| Underlayment on the gas tank. |
Carpet Dye
When you go parchment interior the dash pad and the carpet are supposed to be black. Well, my budget was pretty much shot for now so I opted to dye the original carpet to get me by until I do the interior up proper. I started by laying it out on a tarp and washing it with carpet cleaner and letting it dry. Then I found several web articles and forum discussions on how to dye carpet using Rit Dye. Basically, you fill a tub with hot water, several bottles of dye, and a few cups of salt and soak the carpet in it for awhile holding it under with some kind of weights. I soaked it in a couple of sessions. The first was four hours and I could still see a red tint, so I refolded it, added a couple bottles of dye and left it overnight. The carpet still has a red tint to it in direct sunlight but it's good enough until I replace the interior this winter. I used
THIS and
THIS as a reference.
 |
| Washing the carpet |
 |
| The dye bath is ready and the carpet is folded for the soak. |
 |
| Holding it down with some bricks. |
 |
| After the second soaking. Note that the vinyl parts weren't touched by the dye. |
 |
| Vinyl dye to the rescue. Masked off the carpet so it wouldn't get all crunchy with the dye paint. |
 |
| Front carpet panel fitted into place and held along the tunnel and rockers with 3M spray adhesive. |
 |
| Rear section of carpet installed. Both sections had to be fitted with respect to the seat mounting holes and the front with respect to the dimmer switch and shifter holes |
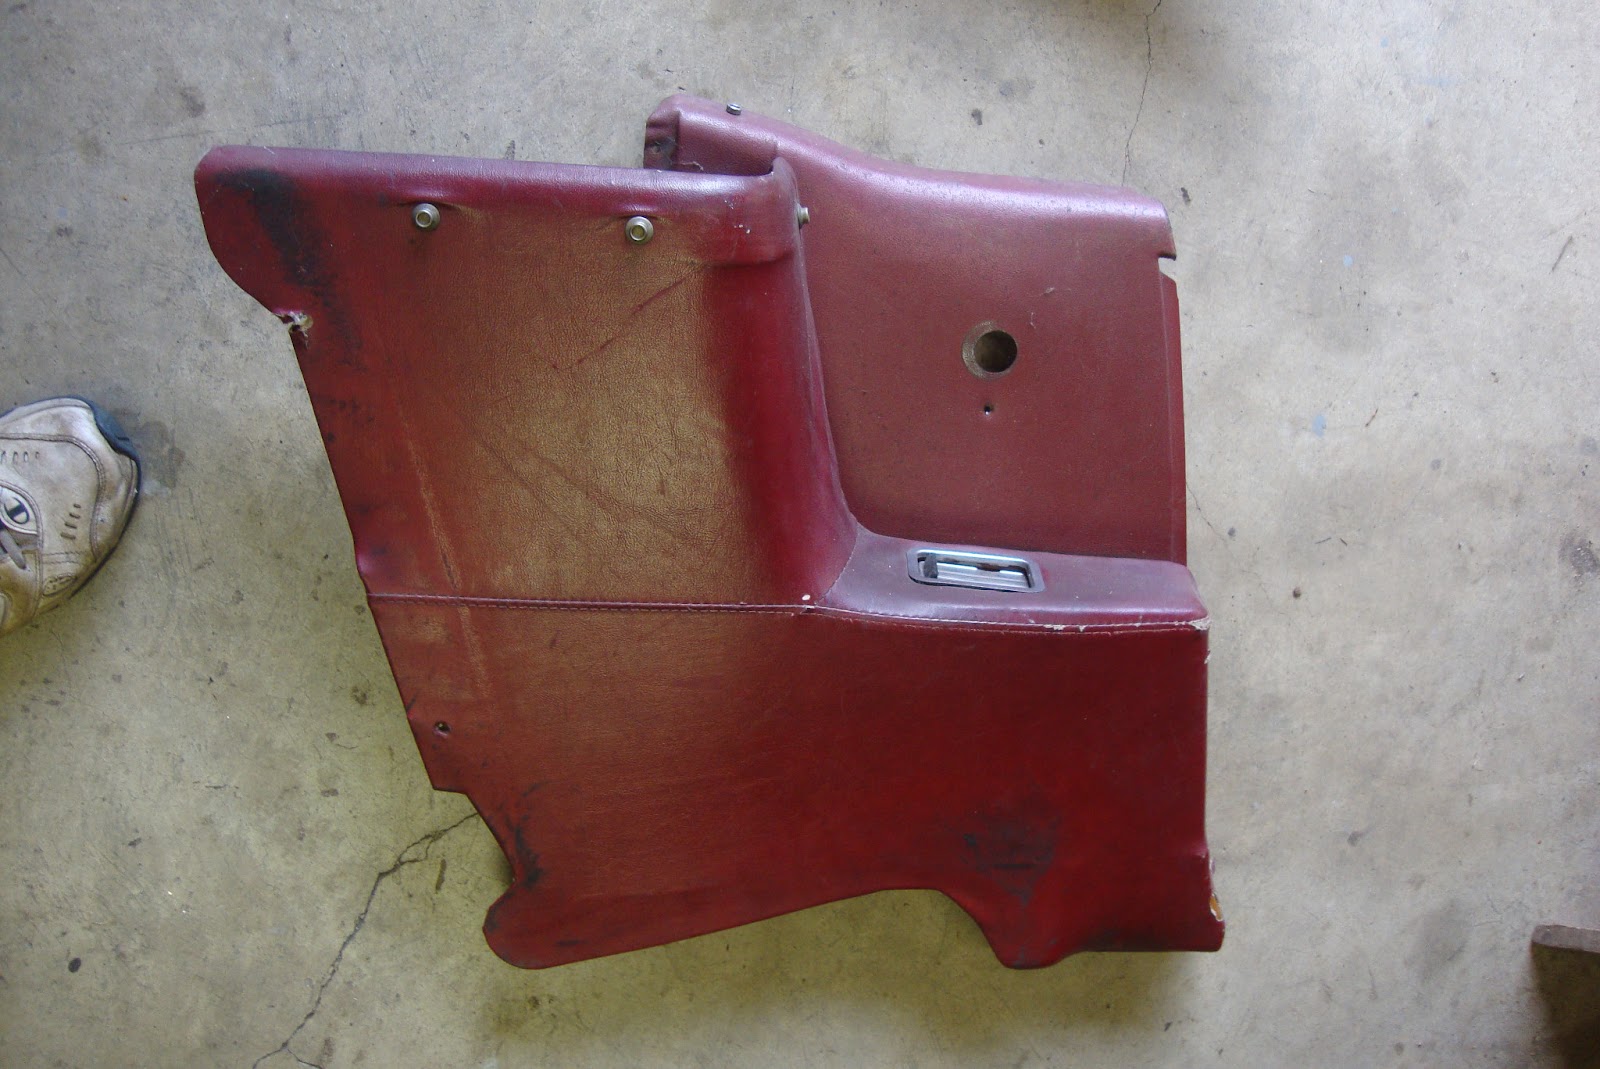
Quarter Interior Trim
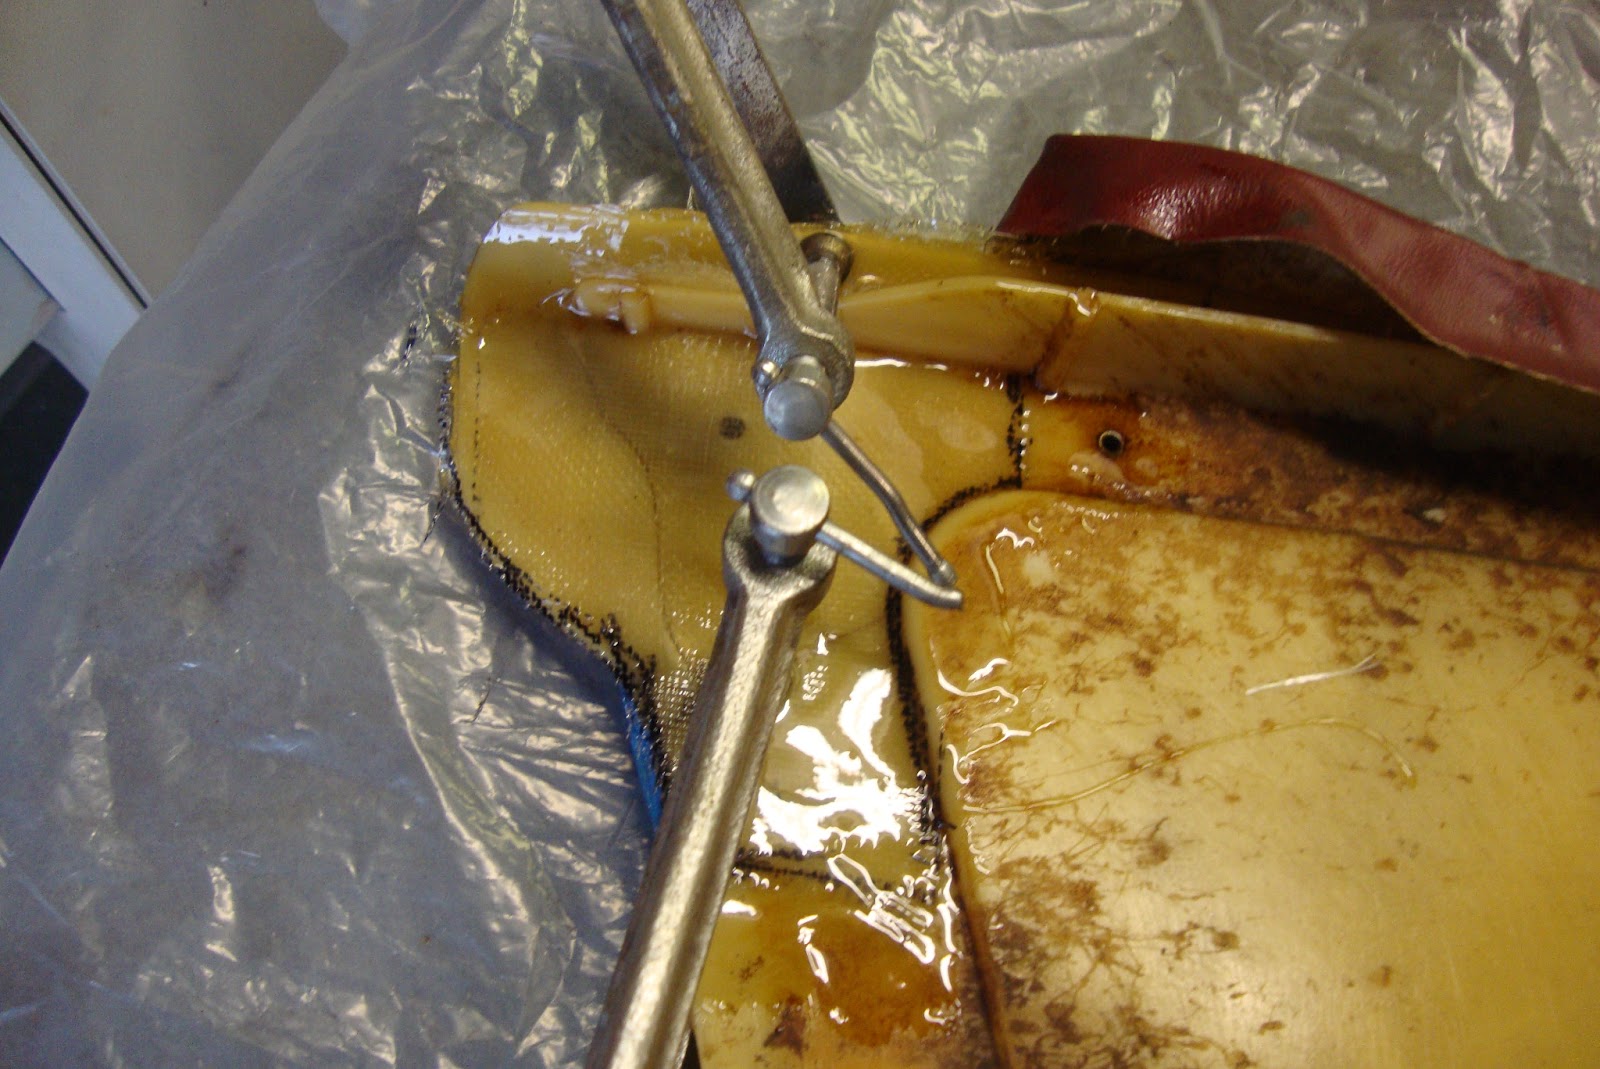
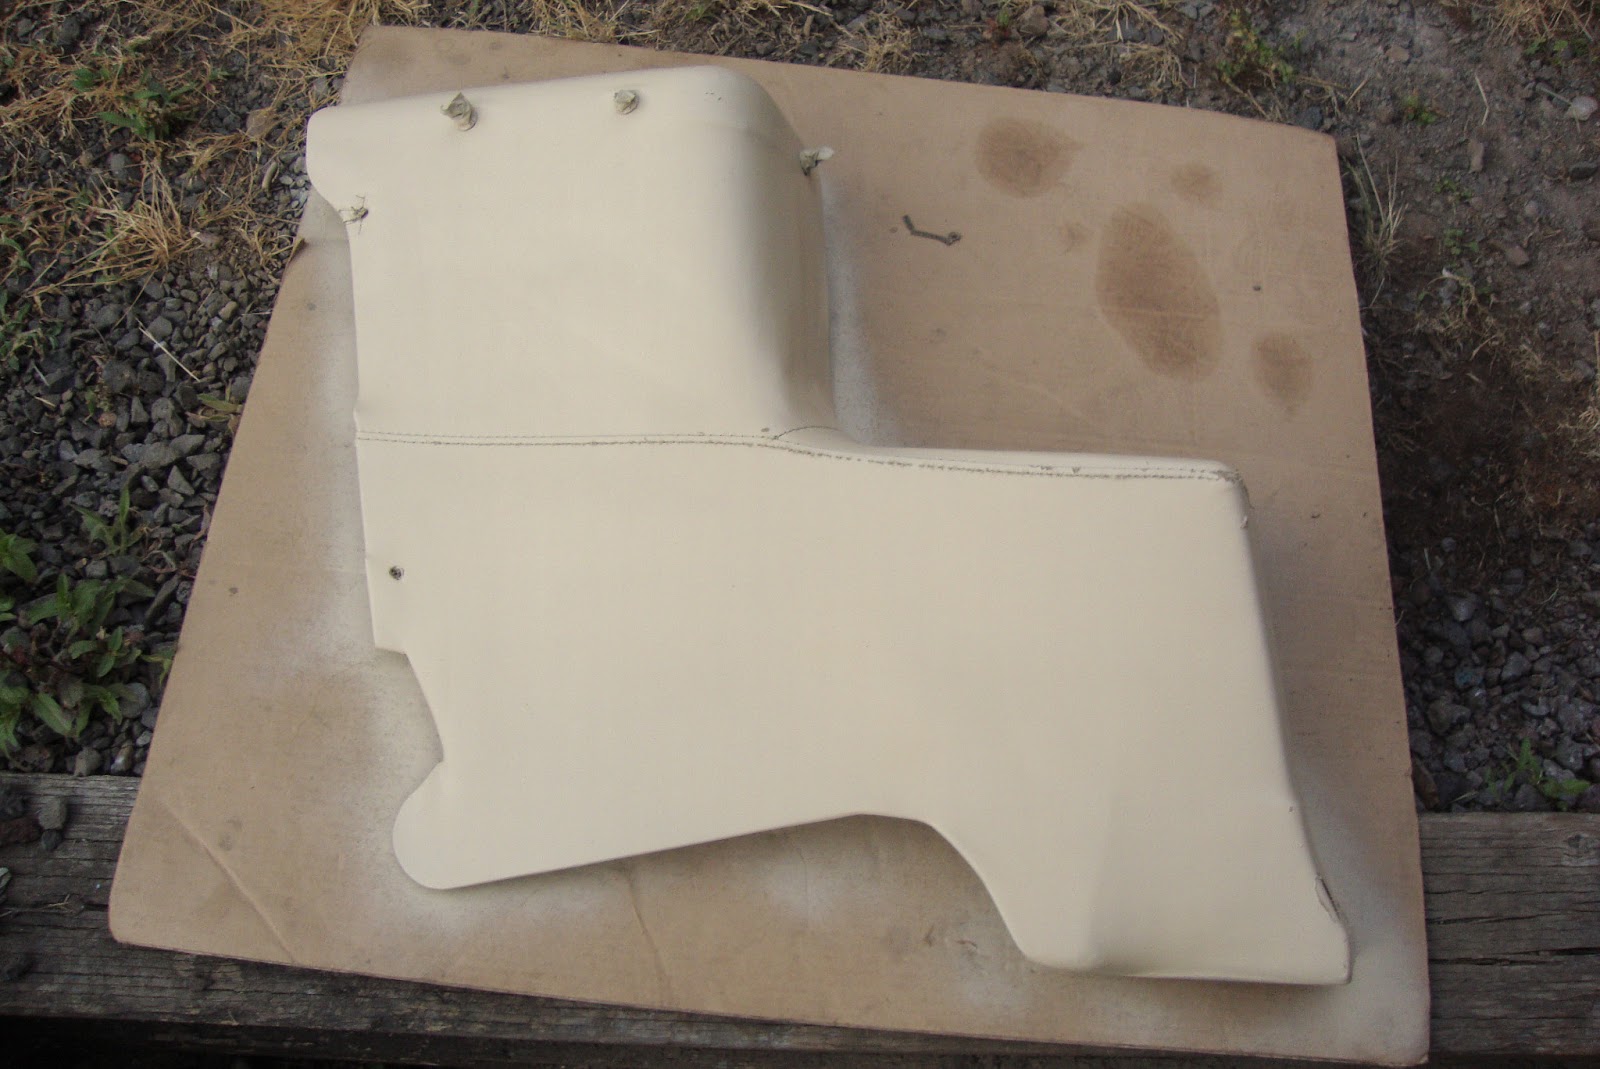
The last part that I took the time to document was the rear quarter interior panels. Like the dash pad and the steering wheel pad, the rest of the soft parts had to be cleaned and dyed with parchment dye. The rear quarter panels are made up of several parts. A fiberglass (or ABS?) part, a metal section, and then some padding and a vinyl covering on the outside. The ash trays and metal sections were removed and the snaps were masked off. Unfortunately, the metal is held on via screws through tabs that were mostly broken off. I opted to use fiberglass to repair these parts as well as some other fractures. After it was repaired, I cleaned it up, sprayed on some vinyl prep and applied the dye to the vinyl. The metal was cleaned up and painted with the same paint used for the dash and doors.
 |
| Before |
 |
| Taking it apart... hmmm... lots of missing screws |
 |
| Doh! Lots of broken screw mounting tabs. |
 |
| And a shattered corner |
 |
| Applying new fiberglass to the corner. |
 |
| Rebuilding the tabs out of fiberglass. |
 |
| Snaps masked off and vinyl cleaned and sprayed with vinyl pep. |
 |
| Parchment dye sprayed on in several coats. |
 |
| Reassembled and screwed back into the rear quarters. |
That's all there is for this entry. I don't have any more step-by-step pictures from here on out but I'll take some detail shots of the finished parts of the rest of the reassembly and do another summary entry. Don't worry though, I'll be redoing most of the interior this winter and documenting it fully including recovering the seats, installing a new convertible top (if I decide to do it myself), installing new instrument/dash bezels, new door panels, new carpet, and recovering the rear quarter trim with new vinyl and padding.


Congrats on getting mobile Alex - I guess you are our Grand Prize Winner!!!
ReplyDeleteCan't wait to see you Mustang Monthly cover shot!
rj
Thanks RJ. What do I win!? Yeah, I don't think MM would be very impressed. Wait till you see pics of the red seats in the parchment interior because I can't afford seat covers yet! It's pretty... pretty ugly. LOL!
DeleteAmazing work there Alex! I am always impressed with the way you always research it and pull it off like a pro! Awesome!
ReplyDeleteThanks James! I appreciate your continued support and encouragement.
DeleteHoly Mackerel Alex! You covered a lot of territory on this blog. I think I bookmarked a half-dozen of the websites and videos for future reference. Excellent work and progress. I have only one thing to say...more videos of the car!!!!
ReplyDeleteThanks Dennis! I'm honestly not sure of what would be video-worthy at this point. Perhaps a short test drive and/or tour of the car as it sits now?
DeleteWhen you get the 'vert mostly together where you're able to drive it, then the vid with a drive and walk-around would be great. BTW, those front valance pix are a great help to me since my car front end was missing it, the bumper, and grill.
DeleteOkay, will do Dennis. Glad the valance stuff helped. I might have some more detailed pics that I didn't put in the blog if you need. Let me know and I'll see if I have them and email you.
DeleteAlex, Check this out!!!!
ReplyDeletehttp://allstangs.com/blog/1968-mustang-390-gt-convertible
Awesome! I love the color combo that guy chose. Genius! :-D
DeleteLove your work. I'm doing pretty much the same with my 67' hardtop. It has inspired me and given me much needed encouragement. I'll ask you how to do the windshield roping thing later on, when it's time to put it back together.
ReplyDeleteIvan (mistermiracle)
http://projectelchato.blogspot.com/
Thanks Ivan. I've added your blog to my watch list and am anxiously awaiting your updates on the cowl repair.
Delete