I dug the quarter windows out from under my bench where they were being "stored" and found the plastic baggies full of quarter window hardware. Now, if only I could remember how to install the darned things. I looked through my photo archive and found that any pics I took of their removal had been lost in the "Great Accidental Photo Deletion of 2009"... A very dark day that I don't want to talk about. I searched the web and couldn't find a suitable How To but I did find this
exploded view diagram that helped a lot (also in my Ford Service Manual).
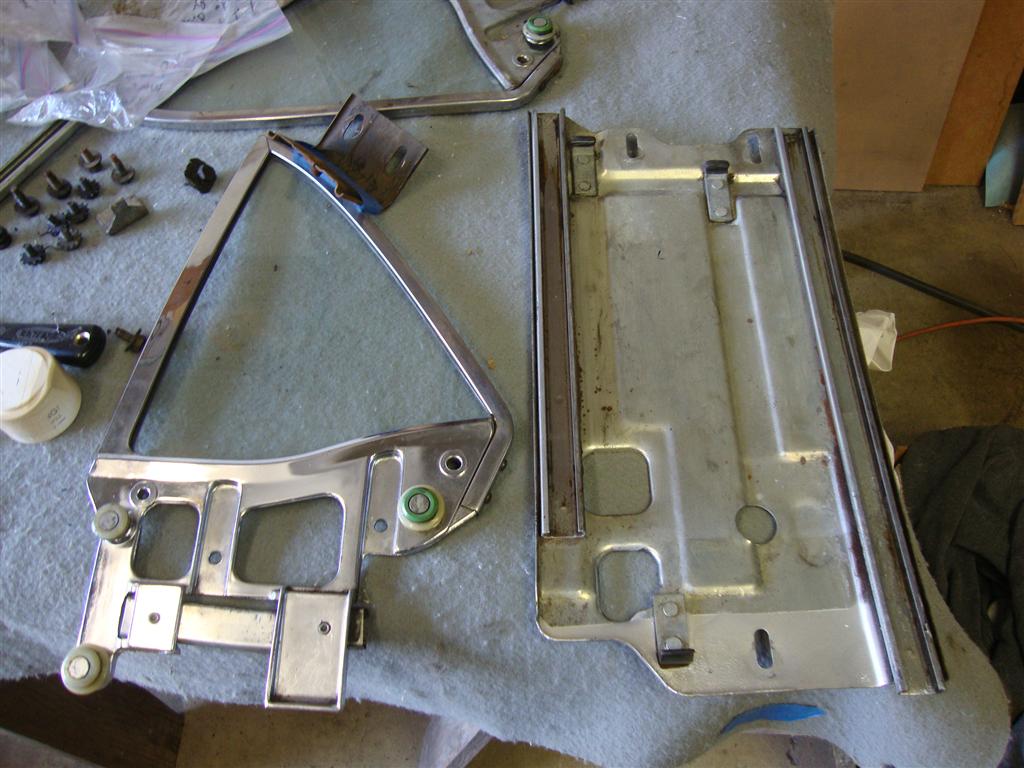
Before anything should be installed, the various bits need to be cleaned up somewhat. I spent a lot of time with a rag and a can of lacquer thinner to remove the old grease and grime. There was some rust on my guide assemblies so I treated them with Ospho and hit them with some self-etching primer and aluminum paint. Not an exact match by any stretch of the imagination but good enough to spend another few decades in the recesses of the quarter panels. One of my quarter window brackets was missing a bolt-in window stop and both had bad seals. Luckily I was attending the Portland Swap Meet the following day where I picked up a destroyed quarter window that had both stops as well as a new set of seals allowing me to complete the job that night. Also, I media blasted the lower brackets and gave them a new coat of black paint.
The guide rail lube was an interesting compromise though. The Ford factory manual called for a "Polyethylene Grease". I read all of the cans of grease at NAPA and found nothing that even remotely resembled "Polyethylene". I finally decided that it was an obsolete form of lube, probably made from the blubber of some extinct species of whale or such, and settled for "Multi-Purpose Marine Grease". It seemed to have properties that I felt were beneficial to this task in that it is water and temperature resistant as well as being of a fairly tacky consistency which means that it would stick where it's placed and not melt and run down into the rockers on hot days nor freeze up on cold days. I've also learned that the generally accepted grease that people use for guide channels is white lithium grease. One other option is
Valvoline Multi-Purpose Grease for Ford. Whatever you choose, you don't need to fill the channel with grease. Rather just coat the edges of the rails inside and out where the rollers will have the most contact.
And now on to the step-by-step:
 |
| Cleaned up parts. |
 |
| My grease of choice |
 |
| I used an acid brush that I cut down to about 1/4" to spread the grease along the tops and insides of the rails and around the rollers. Yeah, this is really "Step 1" but then that would mess up my whole "12 step program" schtick so just deal with it m'kay? |
 |
| Step 1: Install the guide lower bracket with two bolts into the captive nuts in the rocker. |
 |
| Step 2: Install the regulator stop (the L-shaped bracket with one bolt) |
 |
| Step 3: Insert the guide assembly down into the window slot from above and loosely insert top two bolts into the captive nuts in the upper quarter panel and the single lower bolt into the captive nut in the lower guide bracket (red arrows above). Set the guide assembly as far down and back as possible to make room for the window assembly rollers. Note the bolt location for the regulator stop from Step 2 above. |
 |
| Step 4: Align the window rollers with the guide channels from the top and lower the window assembly into the guides. The bottom roller and stops (red arrows) should not be installed until after you drop the window into the guide channels. Step 5: Insert the roller and bolt in the window stops. |
|
 |
| Step 6: With the stops installed, pull the window up to the top of it's travel and clamp it in position. |
 |
| Step 7: Set the regulator to the position shown above and insert it into the access hole and guide the crank shaft into it's window crank hole above. Insert its four bolts loosely. |
 |
| Step 8: Crank the window regulator down until the pivot arm is in the position shown. |
 |
| Step 9: Remove the clamp from the window and carefully lower it to the bottom of its channels. Step 10: Insert the window pivot arm pin into the lower window channel roller and snap in the locking clip. |
 |
| Step 11: Grease up the Actuator Arm Guide and insert it into the access hole and insert the pivot arm roller into it's channel. |
 |
| Step 12: Insert the two actuator arm guide bolts show above with red arrows. |
That pretty much completes the install with the exception of the adjustment of the window to the top and the door window which I haven't installed yet. Adjustment seems pretty straight forward as there are the three adjustment points at the top and bottom of the window guide assembly for overall window height (plus a little bit of forward and back) in addition to tilting the window in and out by adjusting the position of the two bolts in the lower window guide bracket that we installed first. When you get it all lined up, tighten all of the bolts down, kick back, and appreciate your hard work. By the way, new window seals can be installed with the window already in the car. You just remove the one screw at the bottom of the rubber seal and slide them down out of the their channel in the window frame while the window is in the up position.
You can then just repeat the process for the other side. That's great for YOU but for ME, I had another fight on my hands before I could just go dancing through the daisies and installing quarter windows for you see, my passenger side actuator guide lower mounting point had been mutilated. Now let's not go pointing fingers as to exactly who mutilated said mounting point because that's not going to solve anything, okay? Okay. The bottom line is that the mounting bracket was in the wrong position because
somebody welded it about 1/4" too far back. So, I had to cut it out, repair the damage and weld it back into the correct position.
 |
| Now who went and did that? |
 |
| Repaired bracket. |
 |
| Welded back in with successful quarter window installation. |
 |
| Quarter windows! |


Awesome photo documentation, Alex! I can't wait to see pictures of the front doors since I took my doors apart and didn't get any good photos.
ReplyDeleteThanks! I will try not to disappoint you sir! :-)
DeleteAlex,
ReplyDeleteBravo! You are going to be driving the 'ol girl in no time at the rate your are hammering through the reassembly work! You're an animal (in a nice way of course 8^)
Thanks Sven. I'm shooting for driving it by the end of May but there's a lot of family activity going on right now that's going to make that goal difficult. This Summer for sure though!
DeleteOh and, WOOF!
After reading your blog, i was waiting for power windows :)
ReplyDeleteHehehe... sorry but this car belongs to a cheap-skate. All of my passengers will have two perfectly good arms capable of cranking windows up and down. ;-)
DeleteSequential tail-lights are hi-tec enough, aren't they.
ReplyDeleteAt this phase installing the outer belt-line "furry" weatherstrips might be wise and easy.
Heh, well the tail lights were a requirement by the wife. I think the weatherstrips have to be out of the way to get the window into the top of the door or at least that's what I remember from when I took the door apart.
DeleteYour 12 steps look more easy than my 24 steps and didn't involve cursing and yelling to get the quarter window in. Then I pulled it all out again because I didn't want over spray when the car will be painted. I think I had to remove the belt liner to get my windows out but adjust the window down below the line to installing new ones might help. Awesome work there Alex.
ReplyDeleteThanks James.
DeleteWell Alex, you have officially passed me. My quarter windows are sitting on the bench waiting for someone to give them the 12 step treatment. Too many robots, not enough daylight :/ Great work!
ReplyDeleterj
Thanks RJ! I'll slow down to let you catch up. :-)
DeleteP.S. - Send me some robots!!
Alex, nice job on the quarter windows. Don't be scratching up the paint while you are at it:)
ReplyDeleteSteve
LOL! I'm being VERY careful, Steve.
DeleteNice job. I just bought a '67 coupe and I'm finding that I have a lot of work to do. I'm glad, because I get the experience of restoring it and learning more about it. I had one back in '87, but I was too young and didn't appreciate what I had.
ReplyDeleteThe previous owner of my "new" car gutted the quarter window hardware and bolted the windows to the top bolt holes where the guide rails were. The hollow quarter panels were stuffed with fiberglass insulation. My guess is the guy was more worried about the sound system than the functionality of the car. Your pics really helped me see everything that's missing, so I can start looking for the parts.
Thanks Morgan. I'm happy that this was helpful to you. Bummer about your windows. I was talking with this kid this weekend about his nice 66 coupe but all he wanted to talk about was his sound system. He wasn't too impressed with my single speaker MP3 player. LOL!
Deleteyou're a lifesaver.....I took mine apart over 3 years ago and forgot how to put them back :)
ReplyDeleteGlad to help! :-)
DeleteIs there any adjustment on the windows, especially at the top. Thanks.
ReplyDeleteDo you recall where you bought the guide lower bracket?
ReplyDeleteI didn't buy the bracket. I cut it out, repaired it, and welded it back in.
DeleteFrom step #1?
DeleteYes. The brackets were already welded to the base of the opening. I had to cut them out to repair them and weld them back in.
DeleteYou just saved me hours of aggravation and frustration. Thanks for doing such a comprehensive and detailed installation. Best one out there!
ReplyDeleteYou're very welcome, Stan. Thank you for the kind words.
DeleteThis was very helpful, but I have been unable to find similar documentation for the door glass/regulator assembly. I feel I have a very good understanding of all the components, where they go and what they do.
ReplyDeleteBut it has been a long time since I took it all apart and I remember some components took quite a bit of wiggling around to get them out. So my main concern is what order to put which component to avoid having to remove one to get the other into position.
I see you mentioned having a write-up on the doors, but I could not find it. Mine is a '67 vert BTW, my less informative blog is here if you are interested.
http://sylvia1967blog.wordpress.com
Please keep this site up.. It will save my life soon. Not joking one bit here!!
ReplyDeleteMaybe one day our mustangs will meet?
Give me 2 years.
Yes sir, you’ve saved my bacon with this post. I figured I would never be able to reinstall that window on my 65 and I truly appreciate you taking the time to document and share. Well done.
ReplyDeleteI have a 68 Mustang coupe on its way over to me in the UK from Florida, and the passenger quarter window is stuck open. Your 12 step plan will be a big help when I get to investigate what the problem is.
ReplyDeleteHoly moly! Been looking for something like this forever. I really appreciate your taking the time to write this up. It's really a life-saver!
ReplyDeleteHi, and thanks for the post. Big help, best install guidw for the windows.
ReplyDelete-Juha
Just wanted to let you know that we are still benefiting from your documentation and generosity in 2026. This was extremely helpful in reinstalling my quarter windows. Thanks for you hard work.
ReplyDeleteThanks for the reply. Glad this stuff is still helping people during the age of YouTube and AI! I've been kicking around the idea of taking it down but you've given me pause. Take care.
Delete