My rear was looking pretty good (the car! the CAR!) but to finish it out, it still needed a rear valance, bumper, and bumper guards. The rear valance was brand new and Steve had painted it all up nice and purty. I installed the reverse lights in their pertinent cut-outs and started looking around for where and how to install the bumper guards and discovered that the so-called "GT valance" I had purchased didn't HAVE bumper guard holes. Oops.. a minor oversight to say the least but this is one of those things that should have been sorted out before paint. Oh well, I transferred the hole locations from the original valance, placed strips of masking tape over where the new holes were to be drilled and drilled them out with my step drill. The paint didn't chip and it looks fine so I dodged that bullet. The second issue reared it's ugly head when I went to test-fit the valance on the car. Ahem... again, another of those things that's best done before paint that I'd failed to take into consideration... it became evident that there was too much metal on the seam that joins the trunk drop off to the rear quarter and the valance wouldn't fit snugly against the bottom of the tail panel with that flange in the way. This one was a little more serious because the only way I could see cutting that flange was with my angle grinder and it loves throwing sparks galore and new paint hates sparks. I laid a welding blanket across the car in the direction of the sparks and laid a couple of layers of masking tape over the exposed paint I cared about that the blanket wouldn't cover. I then drew a cut line and went medieval on it with the grinder. I finished up with a coating of seam sealer on the freshly exposed metal. Everything came out okay in the end so another bullet was dodged and I continued onto the fitting of the valance.
The rear valance mounting consists of 11 self-tapping sheet metal screws along the top edge, and a captive screw on each end that inserts through the bottom rear of the rear quarter. Not so simple is the installation of the bumper guards. These little buggers require special brackets that are bolted to the outside of the rear cross-member with no less than three 5/16" bolts each. One bolt goes down through the gas tank flange into a captive nut in the middle of the bracket, one bolt goes out through the rear cross-member into the upper captive nut of the bracket, and the third is driven in through the lower mounting hole of the bumper guard, through the hole I had drilled into the bottom edge of the valance, and into a captive nut on the bottom of the bracket. There's not much room for adjusting the position or gaps of the rear valance, if you're lucky enough to get all of the holes to line up, you're pretty much done. The bumper guards go on after the valance via two bolts, the bottom one driven through the aforementioned lower bracket captive nut and the bottom of the valance, and the top one is driven through a hole in the rear cross-member and into the upper captive nut of the bumper guard. Oh yeah, and lets not forget the captive screw on each end, they are helpful in holding the valance in place while you align all of the sheet-metal screws but the trick is getting them to stay on the valance. They're supposed to lock into their keyhole slots but mine wouldn't stay so I finally became frustrated enough to glue the damned things in with some seam sealer. After enough fiddling, I got the rear valance and bumper guards installed and moved onto the rear bumper.
 |
| Freshly painted new rear valance with lights and hardware. |
 |
| Bolting reverse light in. Captive screw is visible. |
 |
| Assembled and repainted bumper guard brackets. |
 |
| The mounting position of the brackets viewed from the back of the car. |
 |
| The three bracket bolts. |
 |
| I left too much flange when I welded in the trunk drop-offs. Also, note the square hole in the rear quarter. This is where the captive valance screw inserts. |
 |
| After I trimmed the flange back. |
 |
| Assembled bumper guards. |
 |
| The rear valance mounted but before bumper guards. |
 |
| Inside view of where the captive valance screws enter the rear quarter. |
 |
| Installed bumper guards. |
 |
| An inside shot of the bumper guard brackets. |
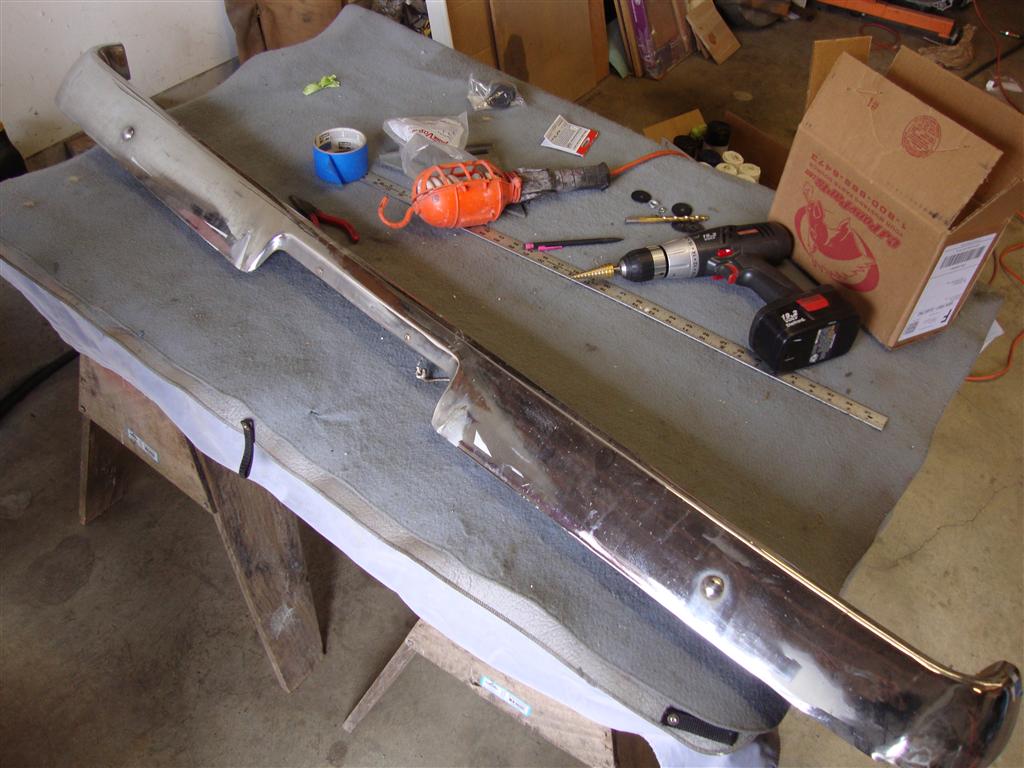
The rear bumper was another adventure. The chrome was just good enough that I decided to keep it for at least this first summer of driving the car but the inside was as rusty as every other part of this car that was exposed to the Eastern road salt. Long story short, I removed the two brackets and the license plate light and used my angle grinder wire wheel to clean out the inside of the bumper. Then I treated the rust with Ospho rust converter, cleaned it up with lacquer thinner and then wax and grease remover. Next the inside was coated with etching primer and then three coats of DupliColor Aluminum Engine Enamel. I media blasted the nuts, bolts, and brackets, painted them all, and put it back together. The license plate light is of the "one wire" variety so the grounding contact points of the light bracket back to the car itself had to have the paint removed to ensure a good ground. The light itself had to be rewired because the previous owner had "repaired" it by twisting the wires together and wrapping it with masking tape *shakes head*. I soldered the connection, covered it with shrink tubing, and wrapped it with a strip of electrical tape for durability. Installation of the bumper only consisted of driving four bolts through the rear cross-member, through some foam seals, and into the bumper brackets. There's a little wiggle room for find adjustment in the bracket position as well as the bumper bolts themselves.
 |
| Don't judge a bumper by it's brackets. |
 |
| It just needs a little spit-n-polish. |
 |
| Cleaned up inside and painted. |
 |
| Reinstalling the license plate light. |
 |
| Completed bumper. |
 |
| The four mounting bolts with seals |
 |
| Done.. or am I? |
Unfortunately, I don't usually get to go riding off into the sunset with something like this. There had to be one more gotcha waiting for me and in this case, it was in the form of running the wiring for the reverse lights into the trunk. The driver side had a correctly placed and sized hole for the rubber seal of the reverse light harness. However, the passenger side had no such hole. This is another of those things I should have noticed waaaayyyyy back before I installed the rear leaf springs. So, I had to get creative with the drill angle and bit type but was finally able to drill the hole, pull the wiring into the trunk, and call this job done.
 |
| Such a nice hole for the reverse light wiring. |
 |
| Em... something's missing boss. |
There's an ongoing debate about the length and fitment of these after market valances so I've included the following pics of the ends and how they align with the rear quarters. Personally, I'm okay with the results but for those of you that are looking for really tight tolerances, this is the net result of a stock install so you'll need to modify the valance to get better than this. Also, FYI, the valance I had purchased is the
Improved "GT" rear valance from NPD. Also, here's a
LINK to an older blog entry where I compare the old valance to the new.
 |
| Driver side |
 |
| Passenger side |


So many trivial little "issues" aren't there Alex... :) gluing the capative screw is a good little tip.
ReplyDeleteHow did you find your rear valance fitted (and your bumper for that matter) across your car. Another small concern I have is that you often see the bumper not aligning acrossways with the rear end of the quarters...
The valance fit okay but stood about 1/2" out from the back of the rear cross-member and had to be sucked in by the sheet metal screws to force it to lay flat. I'm fine with it though. I've uploaded a couple more pics and links to the bottom of the blog entry with close-up shots of the end fitment for your viewing pleasure.
DeleteMore great info! Based on experiences like yours, I expect to "assemble" my car two or three times before I actually get it in paint and assembled for the "final" time (if there is such a thing).
ReplyDeleteEverything is looking so nice and tidy! I can't wait to see more of it coming together!
Thanks Sven! Yeah, pre-assembling the car wouldn't be a bad idea.
DeleteAlex, Don't you just love those "Aw crap!" moments? The 'vert is looking good! Soon you'll be posting a video of the first start. : )
ReplyDeleteLOL! Thanks Dennis. I'm sure there will be MANY more "Aw Crap" moments before the first start. :-)
DeleteMan Alex, you are a Man On a Mission! I continue to like that paint color. The white top will be icing on the cake.
ReplyDeleterj
Thanks RJ!
DeleteAre those bumper guards originally body colored on '68 ? Anyhow, the rear (of the car) does look extremely good !
ReplyDeleteYup! Rear are body color and front are chrome. Some believe that chrome was never used on 67/68 rear bumper guards but others have found examples "in the wild" with chrome. There's a thread about this here: http://www.concoursmustang.com/forum/index.php?topic=2776.0
DeleteThanks!
Looks great Alex. I will need to stop over when I'm running around on a weekend to see it.
ReplyDeleteSteve
Thanks Steve. Yeah, please drop by if you're in the neighborhood.
Delete