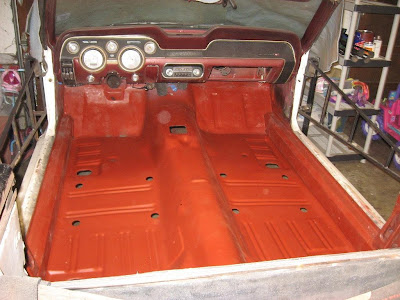
Engine hoist to the rescue! I set the floor on a pair of sawhorses, ran a strap along the center of the tunnel from the shifter opening to the back. This is a good balance point for the floor plus it allows the sides of the floor to flex down making it easier to tuck the edges underneath the rockers. Not easy mind you... but easier than doing it with no help at all.
I was able to roll the hoist through my garage while using one hand to spin and/or lift the floor around obstacles. This image shows a strap running between the seat brackets but I soon moved the blue strap hook directly to the rear of the tunnel to allow the sides of the floor to droop down:

Moving back and forth from one side of the car to the other, I was able to get the floor to drop into position.
One of the problems I found was that there are ears at the back of the floor that go behind the rear torque boxes. These ears have flanges on them to attach to the floor to the inner rocker and the inner wheel well. The flanges don't fit underneath the big braces that extend through the trunk area at the sides of the car and attach to the inner rocker. I had previously cut these braces in half and welded them back together. Now I wish I had waited until the floor was in to reweld the braces. Fortunately, I didn't weld the bottoms of the braces to the rear transition panel so I could cut most of the flange off and tuck it under the brace.
The first image shows the problem brace under which the floor needs to go. The second image is the ear on the floor before cutting and the last image is the ear after cutting.


I then marked the floor with a white grease pen along the floor supports, the tunnel crossmember, rear frame rails, and rear torque boxes. In addition, I marked the overlap of the firewall and the rear seat transition panel. I pulled the floor and marked plug weld holes along all of these areas every 2 inches. The total number of holes tallied up to an even 200. Go figure.
This image shows the floor before drilling the 200 holes. I tried each of my spot weld bits and 3/8 drill bits and found the cleanest, fastest hole was made by my Blair Premium Spot Weld Cutter.
On Thanksgiving Saturday, my brother came over and helped me install the floor. I was really just expecting to drop the floor in and then go drink a beer and watch the Oregon Civil War but the game still had a few hours to start and one thing led to another and next thing you know, we're welding plugs!
And hey, check out the Clecos! Don't know what a Cleco is? Heck, neither did I. I just knew that it was a sheet metal buzz word so I looked it up. Sitting up in bed one night trying to figure out how I was going to clamp the floor during welding when there's no way for a regular clamp to get to the overlapping edges, I visualized a Cleco-ish thing made out of a sheet metal screw and a metal tube. The next morning I decided that it was a good idea but impossibly simple and thus must already exist and happened upon the humble Cleco. I put out a message on the Vintage Mustang Forums requesting where to buy them, etc and got a message from a generous member of the forums who offered to ship me 20 for the price of shipping. Thanks Dave S.!
Well, these things fit the bill and I wish I had them a long time ago. Basically, you just drill an 1/8" hole in the backing panel, insert the expanding barb into the hole and tighten the screw until the larger top portion pulls down to the metal caught in the barb and sucks the sheet metal together. The barrels of these are large enough to be used directly over a 3/8" plug weld hole such that all you need to do is drill the 1/8" hole inside the 3/8" plug hole and insert a Cleco every 2 or 3 holes or where ever the metal is standing apart. You can then remove the Cleco and fill the 1/8" hole and the plug at the same time.
This image shows my brother using a flat-ended spot weld bit to expose fresh metal in each of the plug weld holes. We opted to start at the top front of the tunnel and work down along the tunnel support to the floor supports and then out to the sides under the inner rockers. We then worked on back along the inner rockers.
After moving all the way toward the rear of the inner rockers, we used clecos to clamp the tunnel portion of the rear floor to the rear seat transition panel. I felt it important not to put weight on the floor here since it forced the rear transition slightly out of alignment so this work was done with a foot on each rear torque box.
I filled plugs from the top of the tunnel down each side working toward the outside edges. Last was around each rear torque box.
Welding of the floor is now complete. Next, I need to grind and finish the welds and then recoat the exposed areas in fresh primer.
