Adsense review

Tuesday, December 2, 2008

Welding In the Floor

So having worked so hard prepping the floor, it came time to fit it to the car. It's not necessarily heavy but it is cumbersome and difficult for one person to lift over the top of the door braces and trunk and onto the floor supports. Additionally, the edges need to tuck under each of the inner rockers while the front and rear edges rest on top of firewall and rear transition panels so this makes it even less of a one-man job

Engine hoist to the rescue! I set the floor on a pair of sawhorses, ran a strap along the center of the tunnel from the shifter opening to the back. This is a good balance point for the floor plus it allows the sides of the floor to flex down making it easier to tuck the edges underneath the rockers. Not easy mind you... but easier than doing it with no help at all.

I was able to roll the hoist through my garage while using one hand to spin and/or lift the floor around obstacles. This image shows a strap running between the seat brackets but I soon moved the blue strap hook directly to the rear of the tunnel to allow the sides of the floor to droop down:


Moving back and forth from one side of the car to the other, I was able to get the floor to drop into position.
One of the problems I found was that there are ears at the back of the floor that go behind the rear torque boxes. These ears have flanges on them to attach to the floor to the inner rocker and the inner wheel well. The flanges don't fit underneath the big braces that extend through the trunk area at the sides of the car and attach to the inner rocker. I had previously cut these braces in half and welded them back together. Now I wish I had waited until the floor was in to reweld the braces. Fortunately, I didn't weld the bottoms of the braces to the rear transition panel so I could cut most of the flange off and tuck it under the brace.

The first image shows the problem brace under which the floor needs to go. The second image is the ear on the floor before cutting and the last image is the ear after cutting.


I then marked the floor with a white grease pen along the floor supports, the tunnel crossmember, rear frame rails, and rear torque boxes. In addition, I marked the overlap of the firewall and the rear seat transition panel. I pulled the floor and marked plug weld holes along all of these areas every 2 inches. The total number of holes tallied up to an even 200. Go figure.

This image shows the floor before drilling the 200 holes. I tried each of my spot weld bits and 3/8 drill bits and found the cleanest, fastest hole was made by my Blair Premium Spot Weld Cutter.


On Thanksgiving Saturday, my brother came over and helped me install the floor. I was really just expecting to drop the floor in and then go drink a beer and watch the Oregon Civil War but the game still had a few hours to start and one thing led to another and next thing you know, we're welding plugs!

And hey, check out the Clecos! Don't know what a Cleco is? Heck, neither did I. I just knew that it was a sheet metal buzz word so I looked it up. Sitting up in bed one night trying to figure out how I was going to clamp the floor during welding when there's no way for a regular clamp to get to the overlapping edges, I visualized a Cleco-ish thing made out of a sheet metal screw and a metal tube. The next morning I decided that it was a good idea but impossibly simple and thus must already exist and happened upon the humble Cleco. I put out a message on the Vintage Mustang Forums requesting where to buy them, etc and got a message from a generous member of the forums who offered to ship me 20 for the price of shipping. Thanks Dave S.!

Well, these things fit the bill and I wish I had them a long time ago. Basically, you just drill an 1/8" hole in the backing panel, insert the expanding barb into the hole and tighten the screw until the larger top portion pulls down to the metal caught in the barb and sucks the sheet metal together. The barrels of these are large enough to be used directly over a 3/8" plug weld hole such that all you need to do is drill the 1/8" hole inside the 3/8" plug hole and insert a Cleco every 2 or 3 holes or where ever the metal is standing apart. You can then remove the Cleco and fill the 1/8" hole and the plug at the same time.

This image shows my brother using a flat-ended spot weld bit to expose fresh metal in each of the plug weld holes. We opted to start at the top front of the tunnel and work down along the tunnel support to the floor supports and then out to the sides under the inner rockers. We then worked on back along the inner rockers.

After moving all the way toward the rear of the inner rockers, we used clecos to clamp the tunnel portion of the rear floor to the rear seat transition panel. I felt it important not to put weight on the floor here since it forced the rear transition slightly out of alignment so this work was done with a foot on each rear torque box.

I filled plugs from the top of the tunnel down each side working toward the outside edges. Last was around each rear torque box.

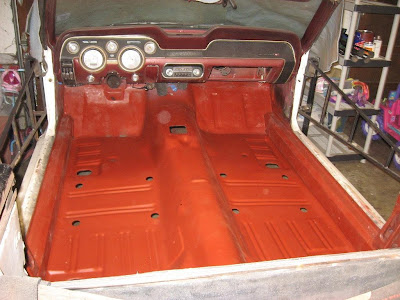
Welding of the floor is now complete. Next, I need to grind and finish the welds and then recoat the exposed areas in fresh primer.

Sunday, November 16, 2008

New Floor Preparation

I ordered the full floor from NPD on Thursday November 6th, On Wednesday the 11th, a tractor trailer pulled up to my house and unloaded a very large, 160 lb box. Even though the NPD sales rep quoted the 14th as the delivery date, my order arrived 3 days early from California via truck freight! Way to go NPD and Conway Trucking!

Now, receipt of a huge box is not all sunshine and kittens, it also involves unpacking and disposing of A LOT of packing materials. Here's the new floor next to the material it was packed in. Granted, the material was necessary to get the floor to me in good condition.

Along with the floor I ordered a new seat platform.

And the full floor kit from NPD also includes lower reinforcements, rear torque box covers, floor pan plugs, and those little rear seat bracket thingies. Unfortunately, I had already reused my original rear torque box covers but I compared these reproductions to my originals and they would have fit perfectly.

Disposal of the packing material consisted of a couple of hours of rolling up the miles of packing paper and cutting up the boxes into manageable chunks. This stuff is ready to be kicked to the curb.

I wanted my new floor to be red oxide rather than black EDP (Electric Discharge Plating) like the original cars were so after a discussion on the VMF, I opted to scuff the EDP with my drill and an abrasive wheel brush.

I scuffed all of the EDP parts on both sides and then wiped down all the surfaces with wax & grease remover.

Prior to applying primer, I welded the rear seat brackets to the rear floor. I was going to weld the new emergency brake brackets at this time but decided to weld them when I'm able to fit the emergency brake cables on the car to ensure that they are welded in the correct location.

I found yet another use for my handy-dandy engine hoist (in addition to a tree puller), to hold up the floor while I paint it. The other floor parts are laid out on a pair of sawhorses. I mixed up 18 ounces of PPG DP74LF epoxy primer, adjusted my Harbor Freight HVLP gun, and shot the primer.

After finishing the first side of all the parts, I waited for the primer to cure, turned everything over and shot the other side. I pretty much just shot one coat. After the car is together, I might shoot another coat over the entire bottom with some clear for protection but haven't decided. Some guys wait until the car is together to shoot the red oxide but I decided it's easier to do it with the panel hanging up than on my back after it's been installed. I'll probably wind up accidentally scratching the heck out of it and having to paint it while it's on the car anyway but experience will tell.

After going over the light spots on the floor a couple of times, I still had enough primer left over to coat the parts already installed on the floor. Prior to this, however, I had to grind off surface rust and treat the existing metal with Ospho. Here's what the front floor area looked like before primer.

And here's the front after primer. It's important to treat this area before welding in the floor because you don't want bare metal in the seams between the toe boards and the new floor since the floor will be the one part installed with and overlapping joint where moisture can collect. Additionally, I treated the tunnel support member with Ospho and ZeroRust instead of PPG since it's old metal and very difficult to remove existing rust properly.

I next had to clean up the back of the car where the floor will overlap the existing rear transition panel. Again, I used a stainless steel wire brush on my angle grinder and Ospho to treat the existing surface rust.

Finally, a coat of PPG primer for the panel. Since the floor was out of the way, I performed the same grinding + Ospho routine on the the inner side of the frame rail but followed up with ZeroRust instead of Epoxy Primer.

Friday, November 7, 2008

Floor-B-Gone

The car is now more structurally sound than it's been in decades with two new inner rockers, patched frame rails, front torque boxes, floor supports, toe boards, and rear wheel well patches all of which make a secure boxed-in frame 68" long by 55" wide.

Up to this point, I've gone to pains to leave the tunnel in place because it in itself provides at least a little structural support for the passenger compartment during the car's, shall we say, "weaker moments". This is how the car looked prior to this task.

I spent some quality time with my drill and Blair Premium Spot Weld cutting bit (which you can see in the image below). After removing around 25 spot welds, the tunnel became a relic of the distant past and now graces the outside of my garage. Looks empty doesn't it? THIS is a Flintstones car.

Here's a view of the rear transition panel without it's friend, the tunnel.

Here's a shot toward the front with the firewall extensions, the floor supports, and the tunnel brace.

And here's the dejected tunnel before I kicked it out in the rain. Of course, I'm going to force some information out of it before I dispose of it permanently. Where are your rear seat brackets? How far back are your lower seat reinforcements? Where do you keep your parking brake brackets? Tell me!! (It won't be pretty).

So, now I have a car with a great big hole in the middle of it. Whatever shall I fill it with? 2x4's? Old warehouse pallets? Crumpled up copies of The Oregonian? No, I think I'll buy a full Dynacorn floor pan from NPD. In fact, I already have but it won't be here until around the 14th but in the meantime, I've got some cleaning up and minor patching to do on the mounting points between the floor panel, the firewall, and the rear seat transition.

Sunday, November 2, 2008

Driver Toe Board

Having welded in the passenger side firewall extension (toe board), it came time to install the driver's side. The driver's side is a bit more confined and thus difficult because of a the obstacles of a fresh air vent and the steering column. I began by marking the approximately squared off patch location that would A) remove all of the rusted, jagged remaining metal and, B) preserve the odd oblong hole in the original toe board just below the steering column for the emergency brake cable. The aftermarket firewall extension didn't have this hole and the steering column indention was of the wrong shape so I opted to try to preserve both since the metal wasn't rusted out in these areas:

Here's the replacement patch as received from NPD minus the red primer. I reused my template from the passenger side inner rocker and marked the driver's side inner rocker and some welding tabs. There's a lot wrong with this panel such as incorrectly shaped driver column indention, missing speedometer cable hole, missing cut-out for convertible inner rocker, and the outside flange is bent down instead of up which interferes with the inner rocker.

This is after I cut out the shape of the patch that I needed, cut out the inner rocker notch with tabs, and bent the outside flange upward. After I cut this panel out, I then overlaid it into position over the old driver's side toe board, torque box, etc. and marked the car to match this patch instead of the other way around as I did on the passenger side. I then cut the original toe board to match this patch. It seems to match the cut-out much better using this technique than the passenger side did.

I test fitted the patch in position and marked from beneath the car, the location of the torque box and frame rail flanges so that I could mark the plug weld holes. The diagnol line represents an angular indention on the torque box inner panel (see first picture) and I had to be careful not to position a plug weld hole along that line. This is a view from the bottom of the patch panel with dots indicated plug weld hole positions.

I then drilled all of the plug weld holes and ground the primer off of the edge that would be mated along the butt weld line for placement against the hole cut out in the driver's side toe board. This is what the prepared patch looked like just before installation.

Finally I could move onto welding the patch in by seam welding the butt joint and plug welding to the torque box and frame rail flanges. You can see the self-tapping sheet metal screws that I used to pull the patch panel against the torque box and frame rail so that there's no space between. The screws were removed soon after this shot and the holes welded closed. Note in this image that the steering column has been removed. This allowed me much more room and comfort for completing this task. Using an air wrench, it only took about 15 minutes to pull the steering column.

Lastly, I ground down the welds with my 4.5" angle grinder, filled some pin-holes and smoothed it all up with a flap disk. There's a little more patching and clean-up to do for both firewall extensions but that will be done after I remove the remaining floor and tunnel which will be my next task in preparation for a new full-size floor which I'll be ordering shortly.

Sunday, October 26, 2008

Passenger Toe Board

The "toe boards" are also known as the firewall to floor extensions. These are the angled panels where the driver and passenger feet reside between the floor and the firewall to the engine compartment. In the case of most of the vintage Mustangs that are in need of restoration, holes and rust develop in these areas as a normal state of wear, tear, and weathering.

In an original car, the toe boards are stamped as an integral part of the panel that makes up the firewall. Fortunately, patch panels are made available and I bought a pair several weeks ago and proceeded to primer them with PPG DP74LF primer to protect them.

This is the passenger side patch panel as it comes from NPD (after I applied primer):

Unfortunately for me, I seem to have purchased a set of panels for a coupe. Coupe panels don't have the cut-outs for the inner rockers at the outside corner. So, I searched several internet vintage mustang parts resellers and couldn't for the life of me find a panel made for a convertible. I finally gave up and opted to modify the coupe panels. In order to do this, I first had to cut out the inner rocker notch. The first step was to make a template out of some heavy poster board as shown here:

The template was then transferred to the patch panel:

I then drew tabs that I would use to weld the panel to the inner rocker.

I cut out the notch with my angle grinder. I soon discovered another problem with the coupe panels. There's a flange on the outside edge that faces down. This interferes with the torque box on a convertible:

The flange then had to be bent upwards in addition to bending the inner rocker notch tabs upwards as well:

With the patch panel laid out, it was time to mark a straight and consistent hole in the original toe boards into which I would weld the patch panel.

After a very long time and several iterations of fitting, measuring, and cutting, I finally had my finished toe board patch. I drilled plug weld holes for the two frame rail flanges and a pattern of 10 plug weld holes to attach to the torque box.

I first tack welded the panel into position and then butt welded the seam and filled the plug weld holes. One of the "joys" of this was that the indention on the right side of the panel, where I had drilled 4 of the plug weld holes, didn't meet the bottom of the similar indention on the torque box into which this indention was to lie. So, I had to hammer the living crap out of said indention to get the plug weld holes to come in contact with the friggen torque box. A little taste of hell which I didn't expect or need:

I then ground down the welds from both sides of the panel, filled many blow-outs and pinholes, ground again, rinse, wash, repeat. In total from beginning to end, this task took me about 3 days for a total time of around 8 straight hours of pain and suffering. I really have to wonder if maybe buying a complete firewall and patching in the entire bottom half would have been easier. One of the primary hassle's was squatting/kneeling under the dashboard area to complete all the steps. I'm really dreading repeating this on the driver's side but, hey, if it were easy... I'd be done by now.

Saturday, October 18, 2008

Finishing LH Torque Boxes & Inner Rocker

After the inner rocker and front torque box are installed, I needed to reinstall the trunk vertical brace, the door reinforcement, and rear torque box cover as shown here:

... And then close up the the end of the inner rocker panel and tie it into the wheel well.

After welding comes grinding... lots of painful, boring, angry grinding.

Up front I patched the cowl side panel where it had rusted out and then ground and ground and ground some more.

A shot from below the front torque box showing... you guessed it... more grinding.

The good news is that the structural steel work is done and it's floors and body from here on out.