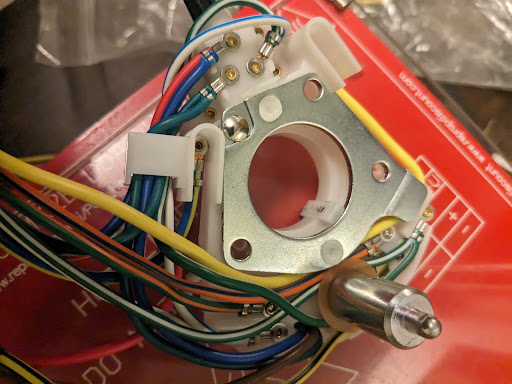
In a nutshell, the turn signals and brake lights are managed via the steering column turn signal/hazard/horn switch assembly. There are plenty of other sites and various forum threads that describe how these switches work but none that really went over the testing of the switches. But what if the switch is actually good but the issue is wiring before or after the switch? What if the issue is like mine where the tail light housing was the culprit? These switches are near the $100 mark so how do you keep from burning one out after another? In my case, the tail light housing burned out the original switch and then a repro switch before I understood how to trace the issue back to the rear of the car without risking another switch. So, here's a test method for testing the switch once you remove it from the car.
First I'll go over the 7 most important wires that feed to and from the switch. Here's a diagram provided by Scott Drake for their repro 68 switch (PN 13341-5a):

White w/Blue: Right Front Signal OUT
Green w/White: Left Front Signal OUT
Green: Brake IN
White w/Red: Emergency flasher IN
Green w/Orange: Left Rear Signal/Brake OUT
Orange w/Blue: Right Rear Signal/Brake OUT
Blue: Turn Signal Flasher IN
Testing The Switch
Note that we have 3 lines IN and 4 lines OUT. We're going to check continuity between the various IN and OUT lines so you're going to need to use the continuity function of a multi-meter (that's the one that beeps when you touch the two leads together). Remember that for these tests, the switch is out of the car and all lines disconnected.
First, let's test the brake line connections. The brake line is the pure green wire (no stripes). The contact on the switch for BRAKE is circled in the picture below:

Make sure that the turn signal rocker is centered and the emergency switch is out and place one multi-meter lead on the metal end post circled above and the other lead on the cable ends of the following wires:
Green w/Orange: Left Rear Signal/Brake OUT
Orange w/Blue: Right Rear Signal/Brake OUT
Both wires should cause the multi-meter to beep or show continuity. In normal operating mode the brake line input should always be connected to the rear outputs. If either output fails to indicate continuity, the switch is bad.
Second, let's test the turn signal connections. The turn signal flasher line that feeds all turn signal outputs is the pure blue wire (no stripes). The contact on the switch for SIGNAL is circled in the picture below:

Make sure that the signal rocker is centered and the emergency switch is out and ensure that the blue wires have continuity to each other by placing the tip of one of your multi-meter leads on on of the terminals circled above and one lead on the other terminal circled above. The multi-meter should beep or display continuity between the terminals.
Next touch one lead of your multi-meter to either of the terminals circled above and the other to the cable ends of the following wires:
Green w/Orange: Left Rear Signal/Brake OUT
Orange w/Blue: Right Rear Signal/Brake OUT
White w/Blue: Right Front Signal OUT
Green w/White: Left Front Signal OUT
None of the lines should indicate continuity in normal operating mode. If any of them shows continuity with the emergency switch out and the signal rocker centered, the switch has a short and is bad.
Next, ensure that the emergency switch is out and the turn signal switch is rocked clockwise (or the direction required to indicate RIGHT turn). Touch one multi-meter lead to either of the terminals circled above and the other to the cable ends of the following wires:
Orange w/Blue: Right Rear Signal/Brake OUT
White w/Blue: Right Front Signal OUT
Both of the lines above should indicate continuity. If either or both lines do not, the switch is bad. Conversely, touch the other multi-meter lead to cable ends of the following wires:
Green w/Orange: Left Rear Signal/Brake OUT
Green w/White: Left Front Signal OUT
Neither of the lines above should indicate continuity. If either or both lines do connect to the blue terminals circled above while the switch is set to RIGHT turn, the switch is bad.
Now, flip the signal switch rocker counter-clockwise to the LEFT turn signal position and perform the following tests with your multi-meter:
Green w/Orange: Left Rear Signal/Brake OUT
Green w/White: Left Front Signal OUT
Both of the lines above should indicate continuity. If either or both lines do not, the switch is bad. Conversely, touch the other multi-meter lead to cable ends of the following wires:
Orange w/Blue: Right Rear Signal/Brake OUT
White w/Blue: Right Front Signal OUT
Neither of the lines above should indicate continuity. If either or both lines do connect to the blue terminals circled above while the switch is set to LEFT turn, the switch is bad.
The final test of the switch assembly is the EMERGENCY flasher. The emergency flasher wire is the white with red stripe and is the input terminal on the switch circled in the image below:

To test the Emergency flasher start by ensuring that the turn signal rocker is centered and the emergency switch is pulled out. Place one lead of your multi-meter on the terminal circled above and the other lead to the cable ends of the following wires:
Green w/Orange: Left Rear Signal/Brake OUT
Orange w/Blue: Right Rear Signal/Brake OUT
White w/Blue: Right Front Signal OUT
Green w/White: Left Front Signal OUT
None of the lines should indicate continuity in normal operating mode. If any of them shows continuity with the emergency switch out and the signal rocker centered, the switch has a short and is bad. Conversely ALL of the lines above should indicate continuity with the turn signal switch centered and the emergency switch pushed IN.
Now What?
Okay so you've confirmed that the switch is good OR you've confirmed that it's bad and have purchased a repro switch and confirmed that IT's good. Now, how do you debug the system after eliminating the switch as the problem AND if your old switch was bad, WHY was it bad? Worse yet, did a short in your system burn it out (as happened to mine)? If your front or rear lights are burning out switches, it could cost you mint and a lot of time before you figure out what it is.
So, I'll describe the process I used to solve my issue and hopefully, something similar will help save you some time.
The first thing I did was install the switch in the steering column but I left the steering wheel off. Make sure your switch doesn't contact the metal housing of the steering column anywhere that it's not supposed to and that includes the horn contacts. Some after-market steering wheels may crush into the switch assembly and short it out so make sure your steering wheel clearances are good before continuing and that your horn contacts aren't bottomed out if the wheel is installed. There should be a bit of distance between the steering wheel horn contact rails and the turn signal switch assembly with the exception of the spring-loaded horn contacts which should make connection with the steering wheel horn rails.
After ensuring mechanical function of the switch after being installed including the emergency switch bezel and the turn signal lever and the wires run out the back of the steering column housing, plug the signal switch wiring harness wires into the harness connector with the exception of the following lines:
Green w/Orange: Left Rear Signal/Brake OUT
Orange w/Blue: Right Rear Signal/Brake OUT
White w/Blue: Right Front Signal OUT
Green w/White: Left Front Signal OUT
This will isolate the various feed wires from shorting something out in the switch again. If you're sure about the function of any of the lines above, go ahead and plug them into the harness connector and leave the questionable line(s) isolated. We can run the same tests that we ran above except we will be running the multi-meter on DC Voltage test mode instead of continuity. Place the black lead of the multi-meter on ground and place the red lead at the end(s) of the wires that were left out of the harness connector. For me it was the wires:
Green w/Orange: Left Rear Signal/Brake OUT
Orange w/Blue: Right Rear Signal/Brake OUT
I used the red multi-meter lead on the ends of the wires above against ground. With the car's battery hooked up, I could test the function of the brake, signals, and emergency against the OUTPUT of the wires from the switch by applying the brake and looking for a constant 12V signal on the multi-meter. Testing the right/left turn signal with the ignition key set to Accessory, the multi-meter will display a kind of a weird millivolt and then a quick 10V or 12V indication for just a fraction of the second as the signal relay clicks on an off. The same type of signal will be seen when the emergency flashers are activated by pushing in the emergency switch. These tests would also be useful at the onset of debugging a signal/brake issue but you would disconnect the switch harness connector from the dash harness connector and remove the suspect wires as indicated above and then reconnect the switch harness connector. There is a special tool that can be used to pull the wire ends out of the harness connector. You can make one with a 5/32 piece of brass tubing.
If one of the connected tests fails, perhaps the issue is at source of the INPUT signals to the switch, e.g. - the brake light switch or the emergency or turn signal flasher lines. Otherwise, if the connected tests are successful and you see voltage on the OUTPUT wires where and when expected, it's time to trace the lines back to the trunk or forward to the fenders.
I then used an alligator test lead with one end clipped onto pin 8 of the under-dash signal harness (see first picture of this blog entry) connector (the dash connector, not the switch connector), and the other end clipped onto one lead of my multi-meter set again to continuity. I then touched the other lead of the multi-meter to a chassis ground point and was rewarded with no beep (no continuity). This indicated to me that my tail light harness wiring itself was not shorted. Further testing involved then touching the other lead not to ground but to each of the other pins in the harness connector to ensure that the subject wire wasn't fused into another wire on the harness which can happen in extreme cases of wire over-heating where the wire insulation melts or burns away but does not necessarily short to ground. This test was also negative.
This is good news but just because it's not shorted doesn't mean it's connected all the way to the end. So the next test was for a break in the wire. The best way to do this is test for continuity from one of the Green w/Orange wire to the other end. Since one lead of my multi-meter was already attached to pin 8 of the dash harness, I just needed to run the other lead to the end of the wire that's in the trunk. This was accomplished using a "jumper" wire. That is, a wire extension from the second lead of the multi-meter to the left tail light signal wire connector in the trunk. The use of a 10' long strand of extra wire I had laying around and another alligator test lead made this possible and I confirmed that the wiring did not have a break or a short so I was good to re-connect the Green w/Orange wire back into the under-dash harness while leaving the tail-light disconnected as I had found my likely culprit. I pulled the left tail light assembly from the car and rebuilt it while checking for bulb issues, shorts, and adequate grounding. When I reassembled the tail light, I was able to test it before installing it by connecting it and leaving it laying on the trunk floor. The tail light proved functional again and did not burn out the new switch.
I hope this helps somebody else at some point. Thanks for reading.
Orange w/Blue: Right Rear Signal/Brake OUT
White w/Blue: Right Front Signal OUT
Green w/White: Left Front Signal OUT
This will isolate the various feed wires from shorting something out in the switch again. If you're sure about the function of any of the lines above, go ahead and plug them into the harness connector and leave the questionable line(s) isolated. We can run the same tests that we ran above except we will be running the multi-meter on DC Voltage test mode instead of continuity. Place the black lead of the multi-meter on ground and place the red lead at the end(s) of the wires that were left out of the harness connector. For me it was the wires:
Green w/Orange: Left Rear Signal/Brake OUT
Orange w/Blue: Right Rear Signal/Brake OUT
I used the red multi-meter lead on the ends of the wires above against ground. With the car's battery hooked up, I could test the function of the brake, signals, and emergency against the OUTPUT of the wires from the switch by applying the brake and looking for a constant 12V signal on the multi-meter. Testing the right/left turn signal with the ignition key set to Accessory, the multi-meter will display a kind of a weird millivolt and then a quick 10V or 12V indication for just a fraction of the second as the signal relay clicks on an off. The same type of signal will be seen when the emergency flashers are activated by pushing in the emergency switch. These tests would also be useful at the onset of debugging a signal/brake issue but you would disconnect the switch harness connector from the dash harness connector and remove the suspect wires as indicated above and then reconnect the switch harness connector. There is a special tool that can be used to pull the wire ends out of the harness connector. You can make one with a 5/32 piece of brass tubing.
If one of the connected tests fails, perhaps the issue is at source of the INPUT signals to the switch, e.g. - the brake light switch or the emergency or turn signal flasher lines. Otherwise, if the connected tests are successful and you see voltage on the OUTPUT wires where and when expected, it's time to trace the lines back to the trunk or forward to the fenders.
An Example Wire Trace
This example is how I tested the wires that ran from my under-dash wiring harness back to my tail lights. I first wanted to ensure that the wires are not shorted to the chassis somewhere between the dash and the trunk. I first had to isolate (unplug) both ends of the line by removing the signal switch harness connector from the dash harness and unplugging the left tail light housing from the trunk harness. This left the Green w/Orange wire disconnected all the way to the back.I then used an alligator test lead with one end clipped onto pin 8 of the under-dash signal harness (see first picture of this blog entry) connector (the dash connector, not the switch connector), and the other end clipped onto one lead of my multi-meter set again to continuity. I then touched the other lead of the multi-meter to a chassis ground point and was rewarded with no beep (no continuity). This indicated to me that my tail light harness wiring itself was not shorted. Further testing involved then touching the other lead not to ground but to each of the other pins in the harness connector to ensure that the subject wire wasn't fused into another wire on the harness which can happen in extreme cases of wire over-heating where the wire insulation melts or burns away but does not necessarily short to ground. This test was also negative.
This is good news but just because it's not shorted doesn't mean it's connected all the way to the end. So the next test was for a break in the wire. The best way to do this is test for continuity from one of the Green w/Orange wire to the other end. Since one lead of my multi-meter was already attached to pin 8 of the dash harness, I just needed to run the other lead to the end of the wire that's in the trunk. This was accomplished using a "jumper" wire. That is, a wire extension from the second lead of the multi-meter to the left tail light signal wire connector in the trunk. The use of a 10' long strand of extra wire I had laying around and another alligator test lead made this possible and I confirmed that the wiring did not have a break or a short so I was good to re-connect the Green w/Orange wire back into the under-dash harness while leaving the tail-light disconnected as I had found my likely culprit. I pulled the left tail light assembly from the car and rebuilt it while checking for bulb issues, shorts, and adequate grounding. When I reassembled the tail light, I was able to test it before installing it by connecting it and leaving it laying on the trunk floor. The tail light proved functional again and did not burn out the new switch.
I hope this helps somebody else at some point. Thanks for reading.
Update 03/12/2024
By request, I'm posting this image of the back-side of the switch to help people trace wires that don't follow the Scott Drake color coding scheme: