With the majority of driver-side under-dash gadgetry installed, I could now bolt in the pedal bracket which would have been in the way had I attempted to install it before now. With the pedal bracket comes the brake pedal and with the brake pedal, the master cylinder.
I had converted this car to disk brakes several months ago. Since disc calipers consume more fluid than drum cylinders, an upgrade to the master cylinder is recommended as part of the update. I chose to use the '74 Maverick master cylinder. I picked one up from
Chockostang, a VMF regular. The Maverick M/C is a direct bolt-in 15/16" bore dual master cylinder with a larger front brake reservoir and a smaller rear brake reservoir. I simply use my old push rod and bolt it in place of my original M/C. I needed to plumb new M/C-to-dist block lines as well as an after market proportioning valve in the rear brake line.
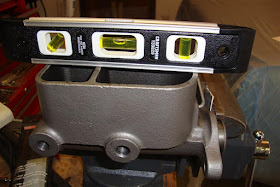
The new M/C needed to be bench bled first though. I clamped it in my bench vice and leveled it front to back and side to side. I then created two return loop lines that fed from the output port on the M/C back into the bowl. The M/C is then filled with fluid and first lightly pumped about 1" to work the air out of the smaller bowl and then pumped full strokes to work the air out of the larger bowl. This is continued until air bubbles stop propagating out of the input and output ports on the bowl. The pumping was done with a push rod without a clip because once the clip locks into the M/C piston, it's a b**ch to get back out without breaking the clip (this didn't happen with this M/C because I learned this on another project awhile ago).
The loop lines are then removed one at a time and the plastic plugs that come with the M/C are threaded into the ports to keep the fluid from leaking. Once the lid is clamped back on, the fluid will not leak so much due to to the lid's seal and the M/C can then be transferred to the firewall of the car and bolted into place through the two captive nuts on the pedal bracket. I next removed the rear plug (going to the front brakes) first and tightened it's dist. block line followed by the front port. All of the brake line connectors were then tightened and/or double-checked to ensure that all brake lines were fully seated and sealed.
The pedal was then placed up in the pedal bracket and the push rod was placed over the pedal push rod post along with a bush, spacers, and brake light switch. This diagram from
allfordmustangs.com might help you with assembly but you can see the picture below for reference as well. The installation order is spacer, push rod, push rod bushing, switch, spacer, clip. The push rod goes between the meal tabs of the switch. One of the switch metal tabs is a slot and the other side is a hole. The hole goes over the end of the pedal bracket post while the slot is inserted between the push rod and the spacer. The final spacer then goes on the end of the post followed by the hairpin clip. I then aligned the pedal pivot with it's mounting hole (making sure the bushings were in place, inserted the pivot pin, and finally the pivot pin clip. Finally, the brake light connector was plugged into the switch. The brake light switch operates based on the angle difference between the flat spot on the end of the push rod and the pedal. If you find that the brake lights aren't working correctly, you can adjust the switch as this
Mustang Forums thread instructs.
With the peal in place, and all brake line connections tightened up, I could then remove the lid of the M/C and top it off with brake fluid and begin the brake bleeding process. There are a lot of instructions on the web on how to bleed brakes but basically, you start at the right rear wheel, then the left rear, then the right front, and finally the left front. The concept being that you're working furthest from the M/C to the closest. I had my wife pump the pedal while I held the end of the bleed line in a cup of brake fluid and pinched the line while she let the pedal up and released when she pushed down until I stopped seeing bubbles and repeated that process on all wheels while keeping the fluid level in the M/C in check. The end result was brakes! I haven't adjusted the rear brakes very well yet but will do that before I drive. Oh, also the prop valve was opened all the way for bleeding and is another thing I'll have to adjust when I get the car moving.
 |
| Leveling the M/C front to rear. |
 |
| Leveling M/C side to side. |
 |
| The loop-back lines. |
 |
| The proper assembly of the pedal post. |
 |
| A side view of the installed brake pedal. |
 |
| Rejoicing because this car hasn't had brakes in years! |
 |
| The installed brake system. |


Good to know about the Maverick M/C, especially since the brake lines are on the same side as the original. I'll be curious about the pedal pressure once you get it all together and tested. I'm adding the 75 Granada front disc on mine and I don't know if I'll need a power booster. Great photos too.
ReplyDeleteRumor has it that the 15/16 bore in the Mav M/C provids the best balance between pedal travel and pressure for manual disc brake systems. From my static tests, I feel that the pressure is not too hard but a driven test will have to prove it.
Delete