Sunday, November 24, 2013

Halo There!

As Summer drew to a close and the sun began to set earlier, we found ourselves returning home from cruises in the dark more and more often.  Ol' Rusty's stock headlights do the job but leave a lot to be desired compared to their modern counterparts.   I started researching modern headlights until out of the blue, I  received a marketing email from NPD declaring, "Halo LED Lights from NPD!".  I raised an eyebrow and opened the email and read on,
"Based around a Xenon H4 style center bulb, the perimeter features 21 super bright LED bulbs. Two versions of the bulb are available: standard white LEDs or a multi-color that features up to 16 different options. Either way, the Halo LED bulbs have an average life span of 100,000 hours, meaning this could be the last set of bulbs your classic needs!"
Hmmm... I was intrigued by the claims and the thought of the halo LED ring had my attention.  I clicked on the link in the ad which took me to the NPD web page for the lights.  The price took me aback and I felt that there was no way on this green Earth that my wife would even remotely consider it but there was nothing to be lost by showing it to her so I did and to my surprise, and her credit, she liked them!  I then recalled that it was originally her idea to do the sequential tail light upgrade as well.  Hmm... the wife likes BLING!

I'm not one to just go out and plunk down hundreds of dollars on something like this without mulling it over... a LOT.  A couple of weeks went by before I decided that, A) this might be something I would like to do and B) I didn't need the fancy-schmancy multi-color LED option; white would be sufficient.  So I went back to the NPD web site to order them and... damn... sold out.  I emailed NPD's customer service and asked them to email me when they received more.  A couple of weeks later, I got an email from "Darrin" indicating that they had more in stock.  I placed the order and waited and a few days later I got a box containing two headlights and some wiring harness extensions.

Apparently, the LED "halo" ring could either be illuminated on the same power line as the headlight "dim" signal or from the parking light signal.  I decided that although the wiring would be slightly more complicated, I would like the LED rings to light up when I pull the headlight switch out to the parking setting and remain illuminated with the headlights.  The headlights contained the normal three-pole connector as well as extra 12 volt + and - leads with no kind of connector.  Now, LEDs don't require much in the way of current (electrical, not oceanic), so the type of connector really doesn't have to be as robust as a regular 12 volt light bulb power source as for head, tail, or parking lights or similar but they would still have to withstand weather and driving conditions.  The connector would only be the first problem, the second would be where and how to tap the parking light(s) power lines?  If I had any patience whatsoever, I would have ordered something like THIS or even THIS (cut in half to make one set).  But I didn't have the patience.  What I had instead was a set of Molex dual-contact connectors that I had used for other electrical projects.  They weren't really moisture proof but I had a plan for that.

Xenon H4 with and LED halo around the perimeter.

The back side.  Standard 3 prong connector and a 12V LED power lead.

I unwrapped the 12V LED leads from around the headlight, wrapped them together with electrical tape, and crimped and soldered the male poles to their ends.  Male poles are generally used for negative (ground) lines or terminated lines that don't have a power source.  The concept is that if they accidentally come into contact with a grounded surface, they won't short out.  They were then inserted into the female Molex housing and protected with heat-shrink tubing.

Male poles soldered to the LED leads.

Molex connector for the LED power supply

The business end of the LED power connector

The headlights also came with new, ceramic, headlight power harnesses that were designed to isolate the factory harness from the head of the H4 bulb.  These were simply pressed onto the 3 bulb leads.

Assembled and ready for installation

A pair of short leads were then prepared with the female poles inserted into the male Molex housing.  This "pigtail" would be the power supply side that would be soldered to the parking light leads.  They were assembled such that even if the connector came apart from the headlight lead, there was no chance of shorting against the grounded vehicle frame.  If I had used the vintage automotive style connector with one pole exposed, that exposed pole would be the ground lead for the same reason.  Safety first.

The parking light power pigtail.

After the headlights were prepared for installation, the old headlights were removed from the car.  3 screws to remove the beauty ring and three screws to release the bezel from the housing and the old bulbs could be removed and unplugged from the factory harness.  The car was jacked up and the wheel removed to allow access to the underside of the fender.

Ready to accept the new headlight

The new headlights came with little square foam pads that the instructions suggested I should stick to the inside edge of the bezel to protect the lenses against cracking.  I complied.

The recommended bezel pads to prevent breakage.

The new headlights were then placed inside the original stainless bezels.  The foam pads helped hold them together but also prevented the headlights from being freely adjusted within the bezels while on the car.  This required that the bezels be pre-aligned with the headlights before installation.  I found that the best position was with the "P" in "TOP" (embossed on the tops of the lenses) be aligned with the leftmost end of the adjustment slot in the bezel.  The pic below is slightly off and would result in the light being slightly crooked in the headlight bucket.  After I had discovered this, I had to remove the headlight again, and adjust the bezel to the alignment previously suggested above.  The headlights were then inserted into the housings in the buckets, fishing the harnesses down into the holes in the back of the housings so that they could be accessed from the wheel-well side of the fender.
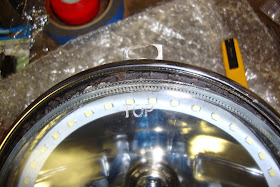
Bezel aligned (poorly) to the headlight.  Put the "P" under the left end of the slot.

Headlight installed but missing beauty ring.

I think that the ultimate perfect method to complete the actual wiring of the power supply pigtail for the parking-light-to-LED-Halo would have simply been to make a "Y" connector that split power off from the parking light's connector off to he LEDs.  Instead, I made the task more difficult than it had to be by splicing directly into the parking light's lead.  This was accomplished by stripping the covering off of the lead and then stripping the insulation on the outside edge of the ground and signal leads and soldering the black (ground) lead of the pigtail to the black wire and the red (+12V) lead of the pigtail to the brown wire.  The soldered splices were then individually wrapped in electrical tape and then collectively wrapped.  I would have preferred to use shrink tubing here but couldn't think of a method beyond simply cutting the wires and building new junctions.

Soldered LED splice to the parking light lead.

Taped up.

Ready to go.

The pigtail was finally mated with the LED power lead and the whole connector assembly was wrapped in silicon tape to defend it against moisture, dirt, and rocks.

LED power lead connected

Wrapped in silicon self-fusing tape.

The moment of truth was upon me.  I nervously connected the battery cable, walked around to the driver's side window, reached in and pulled the switch and...  It's ALIVE!

Parking lights

Headlights.

Pretty darned-tootin' cool if I must say so myself.  The multi-color version comes with a remote control and a computer that needs to be wired in as well and allows you to adjust the LED colors to suit your mood.  As tempting as that is, I think I'm good with the way good-ol-fashioned white looks.

I re-aligned the headlights using the factory service manual as a guide and went for a night drive, on purpose this time, and sure-enough, they work as headlights too.  I'm happy to say that Ol' Rusty's future is looking brighter.

Update (11/25/2013): I posted on the VMF and got a very negative response.  So, if you care what people think about your car or are trying to stay stock, don't do it!  :-)

Friday, November 15, 2013

Ridin' High

Okay, so let's backpedal a bit.  Back to sometime between A MidSummer Night's Update and Power Play.  Sometime around August.  I had attended a couple of shows and had done a bunch of cruising around but something was nagging at me.  Something that I couldn't quite put my finger on.  Every time I'd look at Ol' Rusty sitting in a field, parked next to a curb, or stopped at whatever locale we'd frequented that Sunny day, something just didn't look right.  Then it hit me.  Ol' Rusty was a snob!  Her nose was just riding high up there like some ol' debutante!  Okay, it wasn't quite so bad as that but it was a good solid inch higher than the tail.  So how was I going to solve this dilemma?  Let air out of the tires?  Load a couple hundred pounds of sand in the engine compartment?  Raise the back to level it out?  Tell people to look at it with their heads tilted a bit to one side?  Buy new front springs?  Hmmm...

There were a couple of threads on the VMF that indicated that binding in the lower control arm bolts could cause a car to ride high but I was certain that this was pretty unlikely since I'd had the car aligned and one of the adjustments was the LCA eccentric bolt which would have had to be loosened to be adjusted and then re-tightened all while the car was sitting with it's weight on the wheels.  So, the bottom line is that even though I bought supposed 1" drop 560 springs, there's still some fine tuning to get the old girl sitting up straight.

So, how to "adjust" springs?  Some guys take a torch and heat the suckers till they drop, some guys buy new springs that are a bit shorter, and some guys just cut the top coil off the spring.  Well, it turns out that I'm the kind of guy that has an angle grinder that I've never been afraid to use so I popped a fresh cutting wheel on my trusty DeWalt and revved it menacingly.

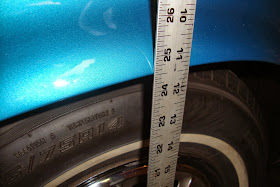
The first question was, "how MUCH coil to cut?".   To answer that, I had to crawl under the car and measure the distance between (compressed) coils.  The fraction of that distance would earn me the net drop in the front of the car.  The second question was, "how much higher is the front than the back?".  This was answered by measuring the distance from my garage floor to the top of the wheel arch of the well opening.  My front was almost exactly 1" higher in the front fender than the rear wheel well (25 1/4" for the front and 24 1/4" for the rear).

I reasoned that a small amount of error too low would give the car a little rake while not quite enough would still be better than the 1" as it currently was.   A win-win!  The magic number for 1" drop turned out to be 1/2 coil.


Standing proud with her nose in the air.

This side shot in front of an awesome vintage "Flying A" gas station shows the higher front fairly well

Front: 25 1/4"

Rear: 24 1/4"

I left the fenders on for the surgery but had to remove the shock tower caps and shocks to get the spring compressor in and the springs out.  Because I have a internal compressor that I had built for removing the front suspension which bolts to the spring perch, those perches had to come out as well.

Once the springs were out, I marked off 1/2 of a coil with a wrap of masking tape and let the sparks fly.  I copied the bevel of the cut edge from the original coil end and painted the exposed steel black.


Removed the spring covers to gain access to the victim

Shock removed and spring compressor ready to go.

Lower end of the spring compressor on the perch.

Spring is out and marked for the cut.

After the cut

After "dressing" the end.

The springs were then re-installed and the height was measured again which came to 25 1/2.  Dang it, 1/4" too high but still an improvement.  I decided to see if driving the car would help to "settle the springs" another 1/4" or so before repeating the process.

Front: 24 1/2"


My lovely models (wife, Kelly and dog, Angel) showing off the car's new stance.

Sunday, November 3, 2013

Power Play - It's ALIVE!

After rebuilding the pump, I cleaned up the main and water pump pulleys (the non-A/C V8 power steering system uses a 2-groove water pump pulley and a 2-groove main pulley), the pitman arm, the center link, and the various brackets and fasteners that came in the "kit" I bought from the seller of this system.

Now the control valve could be threaded onto the center link but there's a rather involved method to doing this to ensure proper tolerances and, blah-de-blah.  However, Dan at Chockostang lent me a bit of his hard-earned wisdom which was to simply look for the divot that the center link pin made in the slot of the control arm sleeve over the 40 years of operation and align the pin hole with that.  Sure enough, there was a light indention in the inside wall of the aforementioned slot which I marked with a pencil and threaded the control valve onto the center link and re-inserted the pin at the position of the pencil mark.  The sleeve clamp was then bolted on.

Parts ready to go!

Indexing the split pin at it's original location

Clamped

Next, the power cylinder's end stud was torqued to the value specified in the manual which meant that the cylinder-to-control valve hoses could be fitted.  I had purchased a set of concours style hoses from CJ Pony Parts only to find that they were inexplicably too short!  I scratched my head for a bit thinking that the hoses were bad.. or wrong... or something and finally decided to compare the power cylinder I had used from the 71 Ranchero to the dented power cylinder I had purchased from the kit seller.  Sumbish!  The Ranchero cylinder was 1/2" shorter!  Craaaaap.  So, I went down to NAPA and ordered a pair of Ranchero-specific hoses and sure enough, they were about 1/2" longer.  Go figure.  I aligned them according to the many images I had of the assembly's before I had disassembled them and tried to match the twists and orientations of the hose ends and proceeded to cinch them down with wrenches and then with vice grips until they could be cinched no more (per another suggestion from Dan in a VMF thread).

Power cylinder affixed to the center link

Mustang power cylinder (top) compared to Ranchero cylinder (bottom).  1/2" shorter.

Correct length control valve tubes installed

After The cylinder-to-control-valve hoses were tightened, I connected the main pressure hose and the return hose fittings followed by a pipe clamp to hold it all together.  Yes, the repro hoses had to have their bends "massaged" a bit to fall into line, so to speak.  The rack assembly was ready to install!

Pressure and return lines attached to the control valve

Ready to install the rack!

Before installing the rack assembly, however, I installed the 2-groove pulleys, the pump bracket, and the pump.  Installing the water pump pulley was probably the most difficult since the fan had to be removed and replaced and lining up the fan bolts with the pulley is always a treat.   The steel pump bracket was then bolted to the front of the water pump and the long stud and spacer was inserted through the P/S pump bracket and torqued to the front of the driver-side cylinder head.  The pump was then ready for business.

M/S crank pulley (left) compared to P/S pulley (right)

M/S water pump pulley (left) compared to P/S pulley (right)

Pulleys and steel pump bracket installed on engine.

Power steering pump ready for business

Now I could move on to the installation of the power steering rack.  However, the cylinder arm bracket mounting holes were just left open on the driver side frame rail so I first needed to remedy that situation with the installation of a pair of power cylinder bracket crush nuts (a.k.a. "rivnuts").  I could just insert them in the frame rail and tighten a bolt but research claims that they will crush crooked that way so a special tool should be used.  The tool is pretty simple though and just consists of a bolt, nut, and washers set up in such a way that the bolt could be held straight while the nut is tightened against the crush nut.  I just welded another bolt to the head of the first to use as a handle to torque against.

Crush nuts or "rivnuts" for the cylinder arm bracket to frame rail

Home made crush nut tool

Using the crush nut tool.  Hold the handle while cranking up the nut against greased washers.

One done.

Both done.

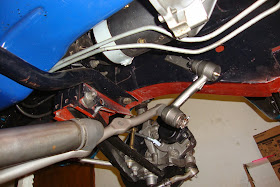
The manual rack had to be removed first including the idler, center link, and pitman arm.  The tie rods were removed from the center link but not from the spindles.  All joints were broken with a pitman arm puller and the idler arm was unbolted from the passenger frame rail allowing the manual rack to be dropped away.  To pull the pitman arm though, I had to buy a new 1 5/16" socket. Unfortunately, 1/2" sockets (my max wrench size) max out at 1 1/4".  After that, they go to 3/4" which I don't have so I had to drop another $6 on a 1/2" to 3/4" adapter.
..
Big-azzed socket and 3/4" adapter.

Popping off the M/S pitman arm.

Popping the tie rods off the M/S center link.

The M/S rack is out
With the old manual rack out the way, I could now bolt in the new one starting with one idler arm bolt and then lifting the other end of the rack up and inserting the vertical cylinder arm bracket bolt to support the weight of the new assembly.  The steering box was then centered and the pitman arm was installed generally parallel to the frame rail torquing the nut down to around 150 lbs using my newly purchased 1 5/16 socket and 3/4" adaper.  The other end of the pitman arm was then mated with the input stud of the control valve, torqued, and pinned.  The tie rods were then mated with their respective center link holes and the idler arm was fully bolted to the frame rail and all were torqued and pinned as required.  Finally, all three mounting bolts of the cylinder arm bracket were torqued to the driver frame rail.

The steering-less car ready to accept it's new power rack

One bolt in the idler arm first to support one side.

Power pitman arm aligned and installed

Power rack installed.

Idler arm installed and aligned for center.

Pitman arm attached to the control valve input stud and hoses run up towards the pump

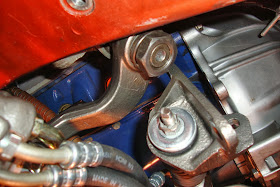
The hoses were snaked up between the driver-side exhaust manifold and the shock tower toward the pump.  Almost all of the required brackets were included in the setup including half of the hose bracket that ties the power steering hoses to the shock tower (via one of the motor mount bolts).  The lower section was missing so I fabricated it out of a 14 gauge scrap I had laying around. The rubber isolator was inserted into the top section of the bracket which was bolted to the lower section and then bolted to the motor mount on the shock tower.

Factory bracket top (right) and my fabricated bracket base (left).

Hoses routed through the isolator with my bracket base bolted to the motor mount

A shot to show the hose bends as they enter the isolator bracket.

The end of the return line was slid onto the return port of the pump and clamped.  The pressure output line was looped next to the shock tower and tightened onto the output port of the pump.  The power steering belt was then installed and tightened and the pump pivot bolts were torqued.


Hoses affixed to the back of the pump.

Fluid ("F" ATF) added and ready to fire up for the first time

I then poured about a quart of power steering fluid into the top of the pump, gritted my teeth, and started the engine.  There was an ungodly growling noise at first as the fluid was sucked out of the pump and squished into the cylinder.  I ran the steering wheel back and fourth several times from lock to lock to bleed the air out of the system and then shut off the engine, topped off the pump, and did it again.  The growling finally subsided and the steering began to feel... powerful.  I repeated the exercise of steering from lock to lock and topping off the pump several times until the fluid level remained steady.  I crawled back under the car with a flashlight to check for leaks and found none!  I dropped the car off of the jack stands and soon discovered that the wheel could easily be turned from lock to lock with one finger with the car sitting in place.  Gotta love it!   I called the wife out and we went for our first power-assisted evening drive.  During the drive, I noticed that when driving straight, the steering wheel was cocked a few degrees to one side.  That boggled me a bit since I had checked, double-checked, and triple-checked the steering box center while hooking things up.  The best I could do is shrug and remove the steering wheel and re-center it.

Wheel cocked off to one side when driving straight?  Nothing that pulling the wheel and setting it straight couldn't remedy.
Despite the steering wheel weirdness, It tracked okay but I took it to Les Schwab the next Saturday for an alignment anyway (with the arning drop specs in hand).  The car was done within an hour and I received the alignment report indicating that the steering was within my specs.   The alignment guy had mentioned that my camber was set very high which is why it tracked okay despite being out of alignment.   This also, might be why I felt that my manual steering was difficult to manage (fighting me on cornering).  Perhaps a lower camber with the manual rack wouldn't really be that bad?  Live and learn I guess.

..
Getting Aligned

I took my wife for another evening drive and this time, it was heavenly.  I must admit that the manual steering box, although it works fine in a power-steering system, leaves a bit to be desired in the responsiveness category.  Don't get me wrong though.  It's still a good driver, just the extra turns on the manual steering box makes the steering "float" a little but still easy to get used to.  Regardless, I got my hands on a proper power steering gear box but that will be another entry for another time.

I've actually been driving the car with power steering for several weeks now and I'm very happy with it for the way I use my car which is lots of slow cruising and maneuvering.  I also feel that the control at higher speeds is better when taking fairly tight corners.  Also, lane correction at highway speeds feels like way less work.  All-in-all, this is one of my favorite mods and I'm happy I put in the time to do it.

UPDATE 10-31-2014: Around January of 2014, I started experiencing severe slippage of the belts.  I'd install a new belt and it would work fine for a while and start slipping as well.  I finally tracked it down to the wrong crank pulley.  The groove for P/S was a 1/2" whereas the belt was 3/8".  I started this THREAD on the VMF but ultimately found a working pulley that one of my local friends actually had on shelf so I bought it.  The pulley was a C5OE-6312-A and worked like a charm although it has a spare outside A/C sheave that remains unused. 

The working pulley C5OE-6312-A.  Showing the groove alignment.  Note the spare sheave.

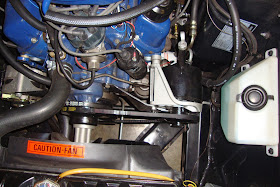
Engine compartment view