Thursday, March 19, 2009

Replacing the Driver Trunk Floor

Come on, gather around. We have a lot to cover today and no time for chit-chat. We're going to cover the replacement of the driver side trunk floor from start to finish and reveal all the ugliness in between.

Speaking of ugliness check this out. I've ground away the paint and sound deader... stuff... to expose the many spot welds that we're about to do war with. Note the bumper reinforcement bracket welded to the floor and taillight panel. Like the passenger side, this needs to come out first.


Poof! See? That wasn't too hard was it? Same as last time, 4 spot welds around each hole on the taillight panel and 5 seam welds along the tabs on the trunk floor. No reason to stand around gandering at the greatness that is our angle grinder now is there? Drill out those spot welds! Same routine as the hundreds of others we've done to this point using my Blair premium 3/8" spot weld cutter.

Sometimes you don't want to see what's skin deep... ya know? I hear it's pretty common for the last 15" or so of the rear frame rails to rust up. No cancer, no foul in my book. There's plenty of structure left so I'm going to grind it, convert it, and encapsulate it.

Ground, converted with Ospho...
... and encapsulated with ZeroRust.

Now repro parts don't just fit themselves do they? I've already had this in position and have marked the locations of the various flanges. In this case, it was the lower rear quarter flange. The repro drop-offs are a bit oversized so they have to be cut down to match the lower quarter and the spot weld holes are marked 3/8" in from the edge and 2" apart.

Same story for the plug weld holes along the frame rail and center trunk transition panel.

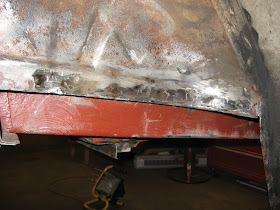
As much as I'd like to go stampeding off to weld in the new part I still have some preparation work to do. I learned a lesson from the passenger side along the wheel well. It seems the old spot welds rust away a bit so I spent a lot of time on that side chasing blowouts. Well, it's no better on the driver side as you can see.

I decided to take further advantage of the inner wheelhouse panels that I've already used for patching the front inner wheelhouse a few months ago. After all, they still have perfectly good flanges don't they? Not for long. Here I've marked the victim for a flange-ectomy.

I cut away everything that didn't look like the new patch... and then a little bit too much more... and tacked it in place.

Gap? What gap? I don't see any gap. I butt welded it all the way and then ground it smoothe.

And finally drilled the plug weld holes for the new trunk panel.

Okay with everything prepared, including a quick color change of the new trunk floor panel, we've finally earned the right to place the new panel in it's new location with a little help from my friends Clamp and Cleco. This time around, after conferring with a very knowledgable guy on the VMF, I omitted the seam sealer between the flanges this time. I will instead leave the outside-facing overlap unsealed but seal the inside-facing flange with normal exterior seam sealer.

I'm not sure of the most proper weld sequence but I chose the top of the frame rail and center trunk transition panel flange first.

Then the drop-offs.

And the inner wheel house last. I actually ground the welds all as one batch but the pictures show the semi-finished welds.
After the floor was fully welded in and the welds ground down, I applied weld-through primer and then re-welded the bumper bracket last by seam welding the 5 tabs...

...and plug-welding the 8 spot welds previously drilled out followed up by some grinding.

So now the back of the car is pretty much patched up with the exception of a few small spots left open during the floor install. Let's have a moment of silence to remember the sacrifices suffered by our fallen comrades, the not-fully-utilized-panels.

And of course, we can't forget Ford's tribute to tetanus.
This completes the majority of welding tasks that this car has to endure. The rest from here on out is pretty much the refurbishing of existing parts and panels.

Sunday, March 8, 2009

Welding In the Passenger Trunk Floor

Now that I've patched the quarter panel, I can weld in the passenger trunk floor panel and close it all up. The Weld & Sealant manual that I've been referencing during this project indicated a strange requirement not specified for any other panel I've replaced to this point. It specified the requirement for sealer between the wheel house and center panel and the trunk floor panel. I couldn't for the life of me determine how I was going to accomplish this without causing the sealer to flame up and burn away. So, I did what any good newbie does, I closed my eyes and did what I was told.

Here's the area ready to have the new trunk floor panel installed with sealer in the specified areas.

But wait! We can't just go welding a new panel in without preparing it first now can we? It's a tiny little panel as panels go so how hard could it be?

Well, first thing I noticed is that the flange that forms the gas tank opening seemed a bit too long. Did I get the wrong part? Was there something wrong with my car? I requested help on the VMF and was soon met with an answer from a kind gent who indicated that convertibles have an extra brace between the rear frame rails. I compared the old panel to the new one and... yeah, the difference is about the size of the conspicuous convertible reinforcement brace.

So I cut out the extraneous portion with the inclusion of some welding tabs and got back to business.

Done yet? Nope, not quite. There's a missing bracket to replace for the spare tire (plug weld holes drilled) and I just wouldn't be happy with the default black coating on the panel so I had to scuff it and prime it red oxide.

Ready now? Nope. Still have to drill dozens of plug weld holes along the frame rail, center panel, and trunk dropoff flanges. Only then would the panel earn my seal of mediocre standards. I can't live without my clecos these days so I made sure to apply them liberally.

Welds along the frame rail, the center panel transition, the drop-off, and the wheel house. Oh and the seam sealer added a whole new dimension of excitement. Fire! FIRE! Wierd though, the sealer expanded between the seams and filled the voids. PRO TIP: I'm not a pro but I did read the weld and sealant manual a little more carefully and it specified weldable spot weld sealer NOT seam sealer.... d'oh!

With the floor panel welded in place, it came time to replace the bumper reinforcement bracket. Ugly, rusty, bent-up thing that took one for the team when I removed it. I took my stainless steel wire cup brush to it followed up with some quality sand blaster cabinet time and finally some good old fashioned straightning up with a body hammer.

I ground down the welds and felt it a really bad idea to leave the freshly ground welds under the bracket without protection. I was in more of a welding mood than a priming mood so rather than spray the entire panel in a coat of DP74-LF, I opted to prime the bare welds under the bracket with weldable primer. I then welded the bracket to the floor and taillight panel. 

Update 7-23-2012: According to a discussion on the VMF, the bumper brackets must be welded through to the frame rail or, " If you only weld them to the floor, they will be so weak the slightest tap on the bumper will crush in the rear of the car".  Obviously, I did it wrong.  Hopefully I don't get rear-ended.


I made 4 plug welds around each hole in the taillight panel and ground them smooth.

Next, I ground down the plug welds on the trunk drop-off.

The new drop-off panel is actually a bit over-sized as you can see here...

...so it has to be cut off flush with the quarter panel flange thus completing the replacement of the passenger side trunk floor. Now onto the driver side!

Tuesday, March 3, 2009

Quarter Patch

I left off by removing the old trunk floor and preparing the rear frame rail for the new passenger side trunk floor panel. So now, with everything else out of the way, I felt it an opportune time to repair the nasty cancer hole behind the rear wheel seen here.


I started this repair by marking the bad area of the rear quarter panel well beyond the cancer with blue masking tape.

I then followed the inside edge of the masking tape with my angle grinder cutting disk. I use masking tape because it's easy to see and follow through the sparks while cutting. With the bad quarter panel section out of the way, the damaged lower outer wheel well is visible and accessible.

They sell a patch for this section BTW which costs around $25. I didn't think to buy one in my last order and didn't want to wait for 3 days to get it so I opted to patch it instead. I repeated my tape and cut routine on the damaged outer wheel house. I left the old flanges in tact because this area contains compound curves and I wanted to maintain the location of the original flanges temporarily and then weld in new flanges after I replaced the main area of damage.

I fabricated a new patch and welded it in and then cut out and welded in strips along the edges separately for the flanges.

I ground the welds and primered the newly repaired outer wheel house. Now I needed to do something about that big hole in the lower rear quarter.

So, I bought a RH rear quarter lower patch panel from NPD.

I used the removed scrap as a template to cut a starting patch. I mark and cut a patch about a quarter inch larger and go through a moderately tedious routine of fine fitting, marking, and recutting against the hole in the quarter. This particular repro patch panel was a bit off and needed some massaging to get the edges to really mesh with the original panel. The creases and bends were not as sharp as the original so I needed to sharpen the bends via hammer, vice, and dolly.

After about an hour of fiddling, testing, refitting, and fine-tuning, I came up with this final fit before welding.

I placed a tack weld at the most flush point between the original and the patch and then consistently adjusted and tacked the panel to the original all along the seam ensuring that the two were flush with each other at every tack point.

Now, the pros I think use a copper bar to back a seam weld like this so that the thin sheet metal stays cool and the seam welds fill properly. I used another method I learned which is to soak a towel (an old T-Shirt in my case) in water, wring it well out, and pack it on the back-side of the weld seam. I wasn't able to get the wet rag between the quarter patch and the wheel house panel so it remained unprotected for which I just needed to be careful. I noticed that the white paint bubbled and scorched where the rag wasn't in contact near the wheel opening which indicates to me that the protected area really was cooler than the unprotected area. This procedure did nothing to help my sloppy seam welds however.... *cough*.

I think the main reason I like to grind welds is that it lets me hide my sloppy welds but this time it's necessary to provide a consistent-looking panel. This didn't turn out all that terrible. I was worried since this was my largest exterior panel patch. A little body filler to equalize things and you won't be able to tell that there was a huge cancer hole here.

Sunday, March 1, 2009

Kicking Trunk and Taking Names

The leaf springs and rear differential are out of the way so now the real work can begin. The back-end of this car looks... well... terrible. The scale rust is pretty bad but hasn't gone so far as to be cancerous. I was pretty fair with my determination to stab a philips screwdriver through the panels and although I found some thin spots near the trunk drop-offs (I'll show you those later), the metal really wasn't deteriorated to a point of failure. If it were worse than this... if there had been evident cancer, I honestly would have gone to the trouble of replacing the shock mount reinforcement panel shown here:


Instead, I opted for the stainless steel wire knot cup-brush with 5/8" arbor that screws onto my angle grinder. I set to work and was soon literally engulfed in a cloud of rust and was pretty thankful for the respirator I was wearing. The cup brush lets me get into the grooves and follow the contours of the panel. The stainless steel wire cuts the rust pretty nicely and gets into pits left by the rust damage. I then followed up the task with a poly-abrasive stripping disc that also attached to my angle grinder. This did a surprisingly good job of getting down to bare metal.

After I was satisfied with the job; that is, exhausted after holding the angle grinder over my head for over an hour; I sprayed the area down with Ospho rust converter. This will later be rinsed, roughed, wiped down with varnish remover, and then encapsulated with ZeroRust. I'll admit right here and now that this task would have been better performed by a media blaster and if I had a readily available car hauler I would have welded a dolly to support the rear end and had it done but there's a certain budget I'm attempting to maintain so this is going to have to be the good-nuff level of this task.

So now, just so you don't think me too cheap and lazy, I'll show you the areas of the car that I did feel needed to be replaced. Firstly, there's a rust hole in the lower rear quarter and wheel well.

Secondly, the drop-off on the passenger side of the car has cancer at the bottom...


And third, there's cancer in the inside ridge of the trunk floor where it descends to the gas tank hole. You can see it on the left side of picture just below the wheel well.

Now the metal of the trunk floor is fairly thin, about 20 - 22 gauge and doesn't lend itself to even minor pitting like the heavier metal of the shock absorber mounting panel seen above can. Each side of the trunk floor (passenger and driver) can be replaced as single panels available from reproduction supplier and I've purchased both sides.

But first, I need to get a couple of things out of the way. The first is the rear tail light module. This is easily popped out by removing the nuts from the 6 long screws seen here. The entire assembly pops out in one piece, lens and all.

Secondly, there's a bumper mounting bracket that ties the trunk floor to the rear taillight panel. Unfortunately, this is welded to both the trunk floor and the tail light panel and so the welds need to be cut. Here you can see the position of this bracket on the floor that I've ground down to expose the many spot welds.

Each bumper mounting hole in the bracket is secured to the taillight panel by 4 spot welds. Sorry, no way to do this without grinding away the exterior paint on the taillight panel. Tabs on the bracket are seam-welded to the trunk floor and are easily ground away to release the bracket.

So now the gazillion spot welds can be drilled out... (my personal recommendation is the Blair Premium Spot Weld Cutter).
No sense wasting time taking out old sheet metal carefully, I cut it where I needed to so I could peel it out the quickest.

Here's the rear frame rail after I cut out the old floor panel... and... oops... a slice in the frame rail flange. No worries, I'll weld that back up before I put the new panel in.

One of the reasons I chose to replace the entire panel is so that I could check the insides of the rear frame rails and treat them. I treated the exposed metal to the same stainless steel brush and abrasive wheel that the bottom had gotten earlier. I then converted the inside and outside surfaces with Ospho.
And Finally, coated the surfaces that would be forever closed-in by the new trunk panel with ZeroRust encapsulator. I didn't do the exposed surfaces at this time because I'll be coating the entire trunk bottom area a little differently as one large task.